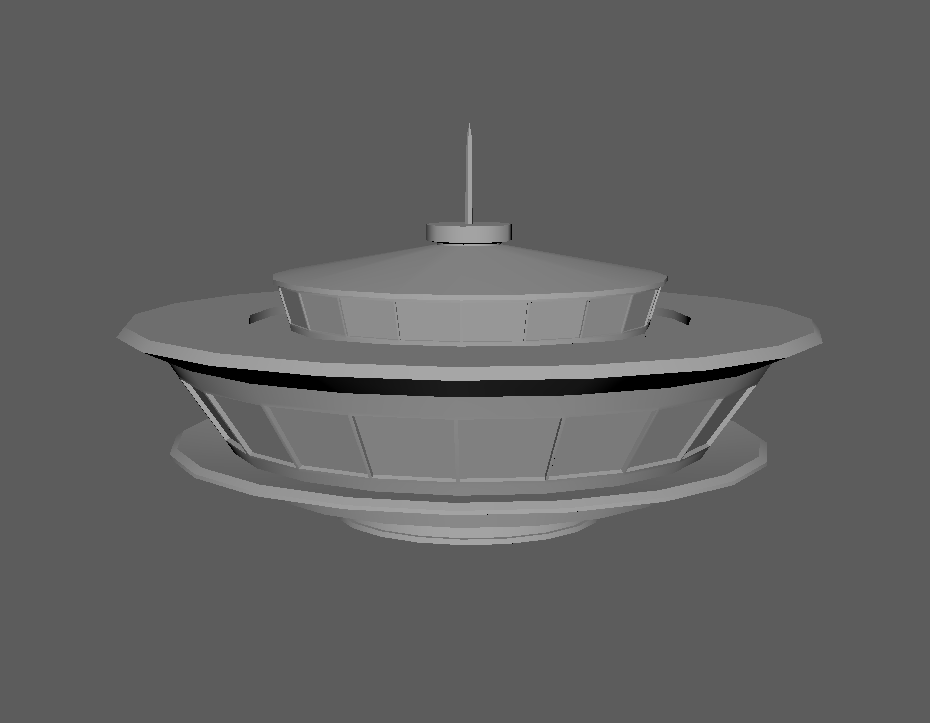
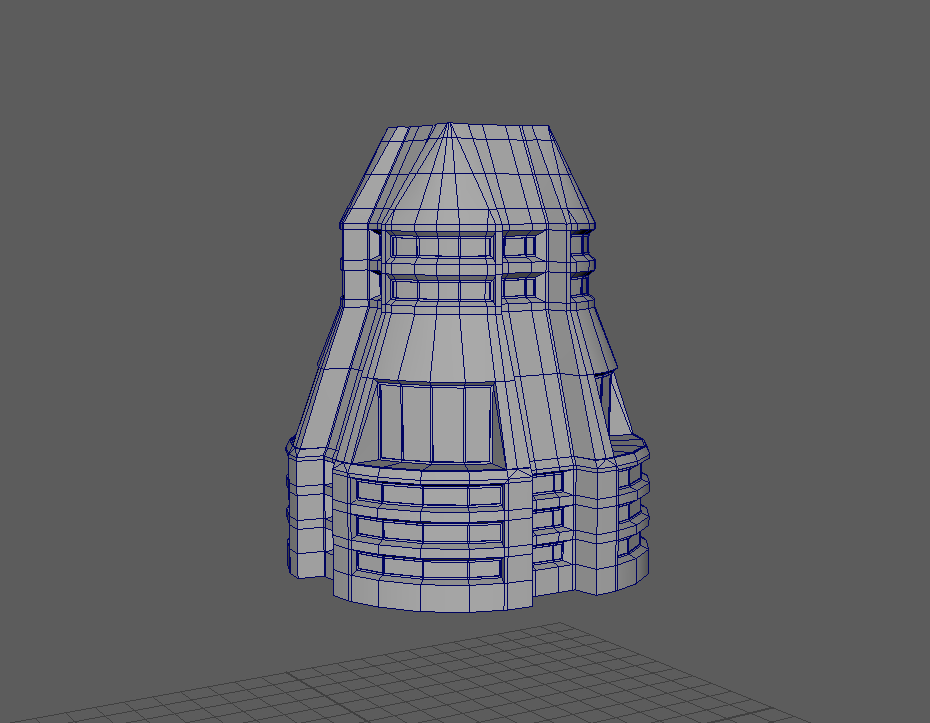
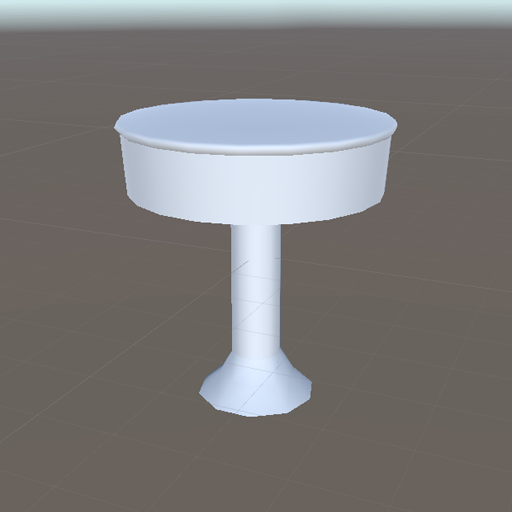
3. FPS GAME - UI AIM INDICATOR
4/5/2022
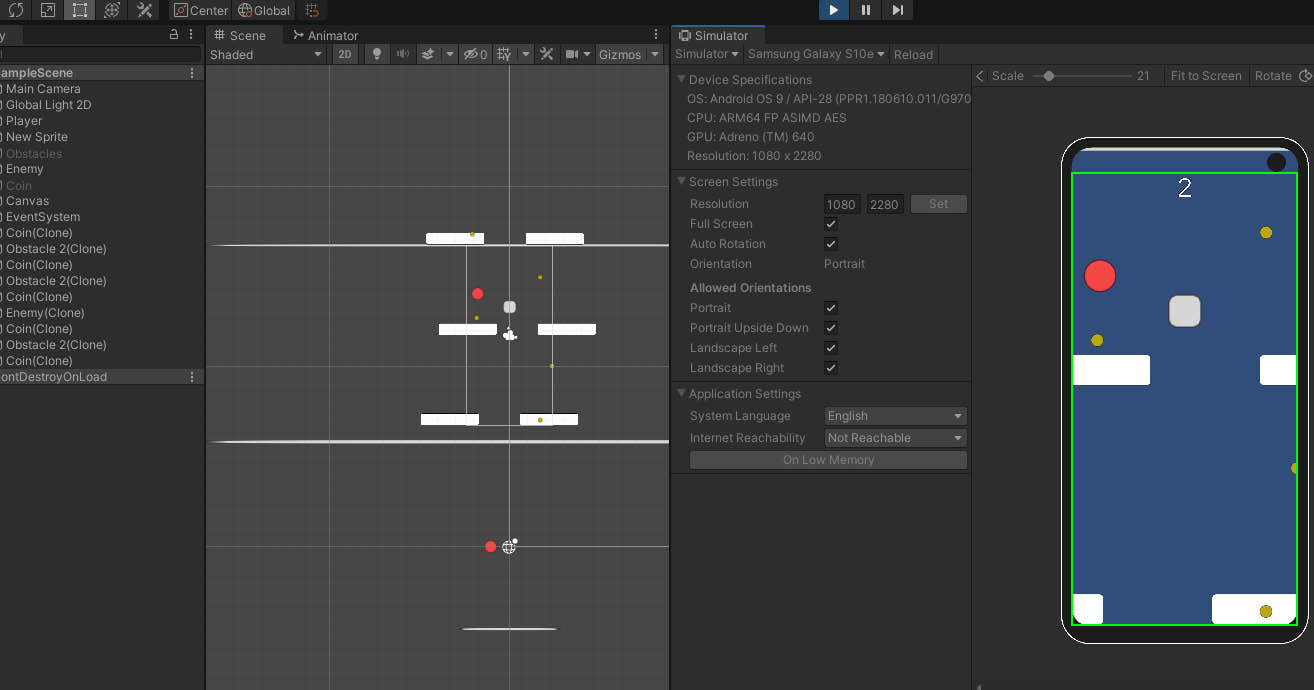
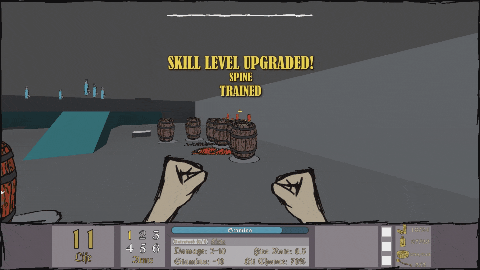
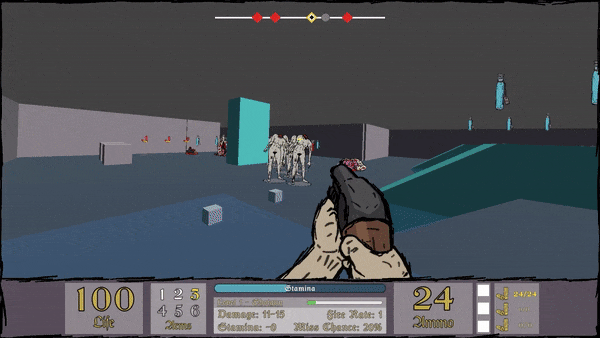
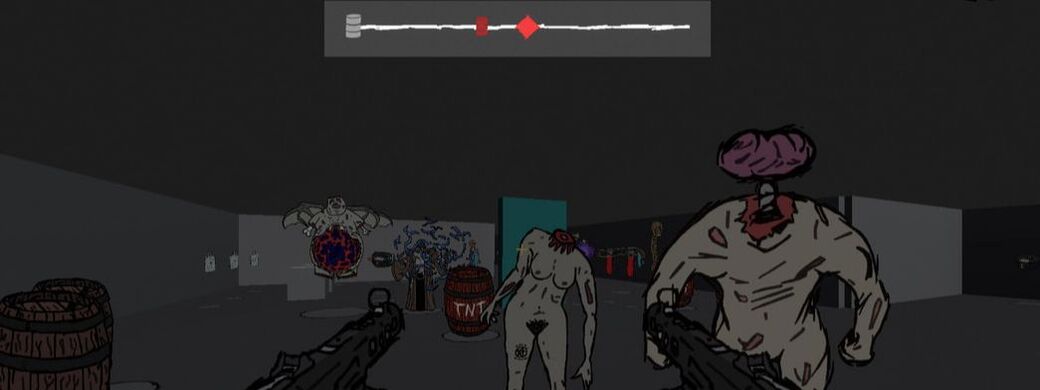 Who you aiming that at? 🔫 To shoot an enemy, the enemy must be in the player's weapon 'collider'. Each weapon changes the collider's width, length, and height. Once inside, the player can shoot the enemy (basically) (there is also hit chances to consider as well as checking if the enemy is behind a wall). Without showing the player if they can shoot and hit an enemy, the player would be confused or not know how far you need to be to attack it. Of course, in the player's mind, if you’re using a Spear instead of your Fists as a weapon, the Spear's reach is greater than the player's Fists. If you’re using a long-ranged weapon, the end point of the weapon collider would be a guess by the player and having the player potentially waste ammo by trying to shoot something they cannot hit is a situation best avoided.  Currently the UI Aim Indicator (TM - *Ding sound*), Shows objects that can be hit by the player's attack. Right now, that includes enemies, as well as barrels (💥explosive and inexplosive!🛢️). In the future this might include other interactable objects such as doors or items, as well as an objective marker. 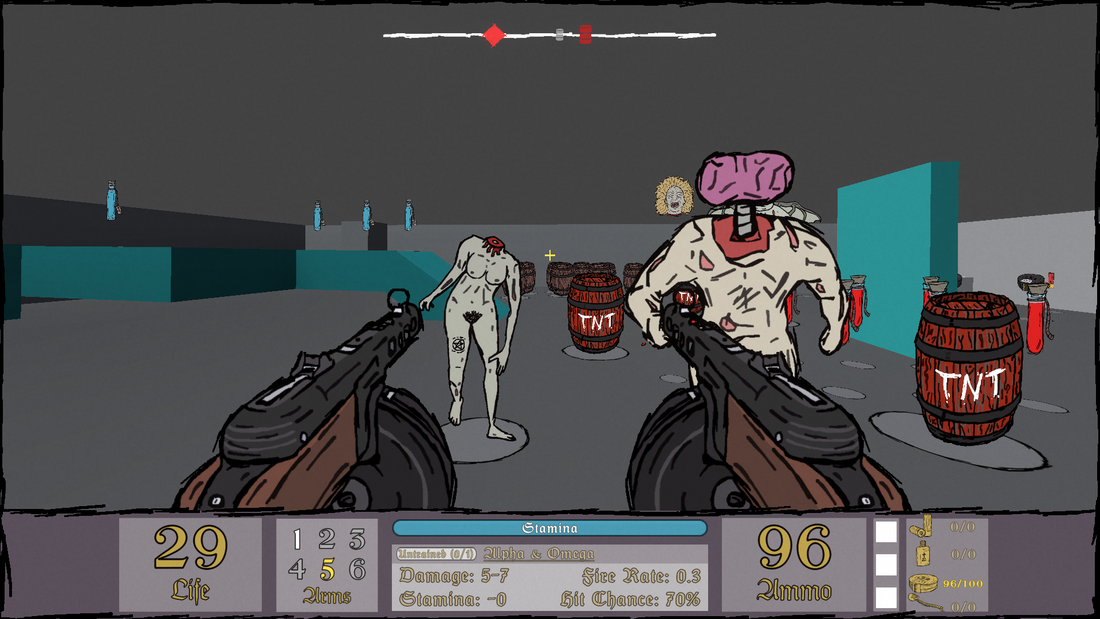 When an enemy has entered the (invisible) weapon collider, an icon class is created and added to a list (of Icons). The Icon class contains; the RectTransform of an icon marker, the RawImage component of that said marker, a reference to the enemy that entered the weapon's collider, as well as the enemy’s position. It then calculates the direction and angle to the enemy and shows the icon on the Aim Indicator UI bar relative to the player's position to the enemy. Icon Class
If the enemy exits the weapon collider, the enemy is removed from the icon list (icon.enemyObject = null) and the icon disappears. There is also a check to see if the player can ‘spot’ the enemy inside the collider. This is done with a Raycast from the player to each enemy in the collider. If the enemy is behind a wall but also inside the collider, the enemy icon is disabled. But when the Raycast finds the enemy, the icon is then enabled again. This is done with another List<> that contains all the objects that are seen. Icon classes only get created if all the icon classes in the list are already being used by an enemy. So, if an already created icon class is not following an enemy and an enemy enters the weapon collider, instead of making a new Icon class, it uses the unused one. If all Icons are following enemies, then it creates a new Icon Class to add another marker to the UI Aim Indicator. (A lot is going on here! 🥵) Show Icon Function
There's also a check to see if the player is looking at a barrel or an enemy. This changes the RawImage sprite of each marker to either a picture of a barrel or a red diamond indicator. But wait, that's not all! 👨💼💰💹 Each weapon has a specific number of enemies that it can aim at a given time. Fists, Spear, Spine, and Bible weapons can only aim at one enemy at a time. They all attack the nearest object to the player. So, the UI Element removes all the other icons on the Aim Indicator if they are in the icon list. The only icon marker remaining is following the object that is nearest to the player. The Shotgun aims at all enemies in the collider that the player can see, and the Machine Gun aims at 4 objects at most, removing other icons of enemies that cannot be hit. (a whole lot going on in the script! - hold on... I need a drink... 🍹... ahhh...)
Ok... so where was I... Oh, right - The icons on the UI bar also take into consideration the distance between the player and the object the icon is following. The further away from the player the object in the world is, the smaller the icon is on the screen (the closer the object, the larger the UI icon is). This helps somewhat to recognize what the player is aiming at. 🎯
0 Comments
2. FPS GAME - WEAPONS
17/1/2022
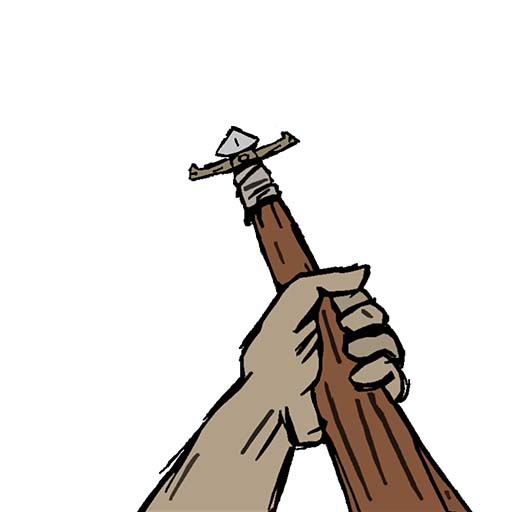
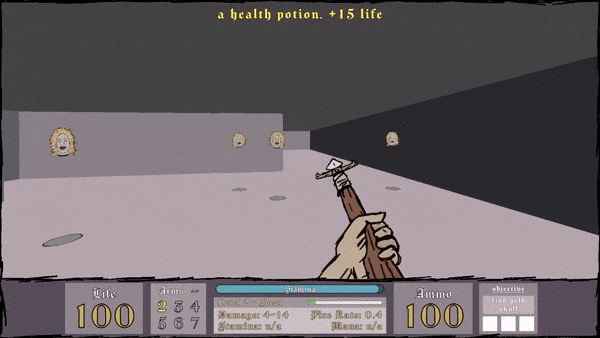
 The player's arsenal. The idea was for the player to have 9 weapons in total, one for each number on the keyboard (except for the 0 key 🙁). But then, thinking about it, it felt unnecessary and bloated and would be harder to make them all useful without the next weapon making the previous obsolete. So I cut it down to 7, and then 6. I want the player to use all weapons in the game, not just one or two, where they just keep switching to their favourites. Helping with that is the amount of max ammo the guns are going to have as well as the amount of ammo pickups in the world. Every weapon in the game can also be upgraded/leveled up. So only using one weapon in the game can really make the game more difficult for the player in later levels. 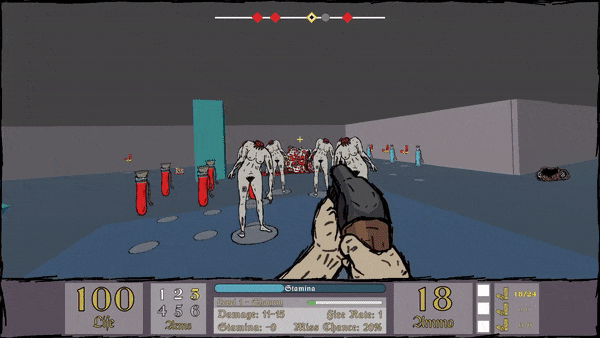 Each weapon starts at level 1 and their max level is level 5 (TBD - might shorten it to 3). Haven't decided what makes your gun level up yet. Initial thinking was that it just counts the enemies you've killed with each gun, and based on that it will level up at a certain amount of kills. The weapon's damage, fire rate, and enemy hit chance increase with each level. I've created tables in Microsoft Excel for each weapon that stores their level values that is read by a script in the unity editor (and in-game). This makes it much easier for me to edit and tweak individual values at anytime.  Weapon Stats Table Each weapon also carries a set of values that modify a Box Collider that is used to check if the player's attack has hit an enemy. So if an enemy is inside the box collider and nothing is blocking the player from attacking the enemy, then the player's attack hits the enemy! Some weapons may use this box collider to aim at enemies. For instance, the player shoot a fireball, which is a projectile, if the enemy is in the collider, then the projectiles direction will be where the enemy is in the world, and move towards that.
Weapon sprites were all made in Photoshop, with the help of a Wacom Pen & Tablet. Took photos of myself (my hands 👐) holding placeholder objects as reference. The spear was a roll of Christmas wrapping paper! 🎅🎁 When an enemy walks into the Player Attack Box Collider, the enemy is added to a list that keeps track of every enemy in that collider. So if the player shoots the shotgun, it gets all enemies in the collider and damages all of them. The shotgun's damage is also higher when the enemy is closer than half of the Player Attack Collider size (closer to player), otherwise its the damage output is low. If you use the Spear, it only damages the enemy that is closest to the player (only one enemy at a time).
I still need to code the weapon hit/miss chance when attacking. So far, if the enemy is in the attack box collider, and the player attacks, it hits the enemy 100% of the time. Might be interesting if there's a chance you can miss as well.
The weapon attacks are all controlled by one script (a script called WeaponAttack.cs). So far, I have created 3 of the weapons. Fists, Spear, and Shotgun (there was a Dagger, but it was replace by the Spear). The Fists and Spear use the same bit of code that's under the function called MeleeAttack(). It attacks one enemy at a time. The Spear has a greater reach. The Shotgun uses a function called SpreadShot() in the same class. 1. FPS GAME - ENEMY BEHAVIOUR
15/7/2021
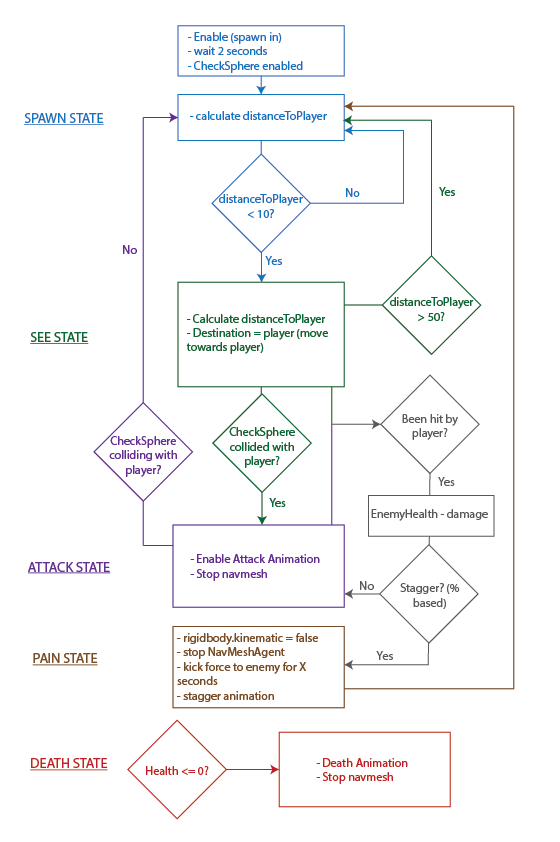
 Creating an 'old-school' FPS game. At this stage, I'm focusing on the game's enemies. Enemies in game have multiple 'behaviour' states and animations that go with each. Behaviour states are what the enemy does at one given time. The main States are Spawn, See, Attack, Pain, and Death. Spawn: Enemy spawns in (gameobject is enabled). Enemy waits 2 secs, and then proceeds to do its first task. See: The enemy has detected the player and will proceed to a position where it can attack the player. Attack: Is in attack position, starts to attack the player. (Attack!) Pain: Has been hit and is knocked back (stunned). Death: Health <= 0. The enemy has been defeated. There are plans to have more behaviour states, like, for example, being Frozen or on Fire. Currently, I'm using a switch statement to handle all the states. The plan is to have around 7 enemies in the game. If things get out of hand, and code becomes messy, I'll have to rethink and change this. But for now, this will do.
The 'brainhead' enemy is a simple melee attacking enemy (no ranged attacks). The brainhead enemy starts off in the Spawn State, where it will calculate the distance between the player and itself. If the player is less than 10 units away, the enemy 'sees' the player. It then sets its destination to be the player (NavMeshAgent). A CheckSphere bool is then calculated to see if it is touching the player. If it is, then start to attack the player. If not, and the player is over 50 units away from the enemy, the enemy returns to its Spawn State (stops following player). Brainhead has two attacks (they deal the same amount of damage and is chosen in its OnEnable method), punches and a headbutt. The enemy will start attacking the player. If the player exits the enemy's CheckSphere, it will finish its attack and return to its Spawn State, which in turn, will quickly change to its See State (because player's distance is less than 10 units away from the enemy).  2. You Got the Power...
8/4/2021
 More work on game mechanics. ⚙️ Continued work for the game by adding an 'enemy' gameobject. The player can drop on an enemy's head to kill them and gain a score point for your overall score. Plan is to have static and moving enemies in game, but for now the enemy does not move. Also added coins that the player can collect. These will be useful to buy (in-game) new skins and/or playable characters, as well as unlock other levels if the score requirement is not achieved. Current 'Coin' Script (moves towards player if close)
Obstacles/walls are now prefabs and a spawner object is attached to the main camera that instantiates obstacle prefabs at a set amount of seconds. This will be improved upon in the future, by creating an 'object pooler' script that instantiates a set amount of obstacles in the scene before game start and then by enabling and disabling them I won't have to keep creating and destroying objects.
1. You Got the Touch...
1/4/2021
 Started to make a small game (very few mechanics ⚙️). Wanted to create a game that included in-game ads. Never actually used them in my (released) games. I'm currently working on a larger game project that will include ads (well, that's the plan as of right now), but I am currently focusing on creating 3D models and environments for that project, so I decided to also create a 'small' game, include ads (while trying not to bombard the player with 'em), and release the game on Android and iOS 📱.
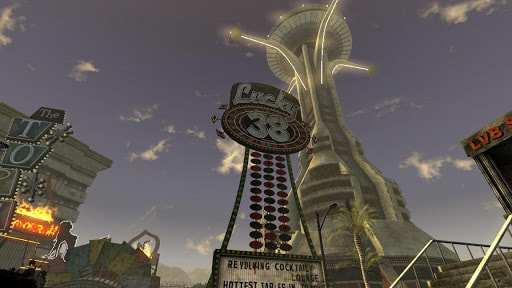
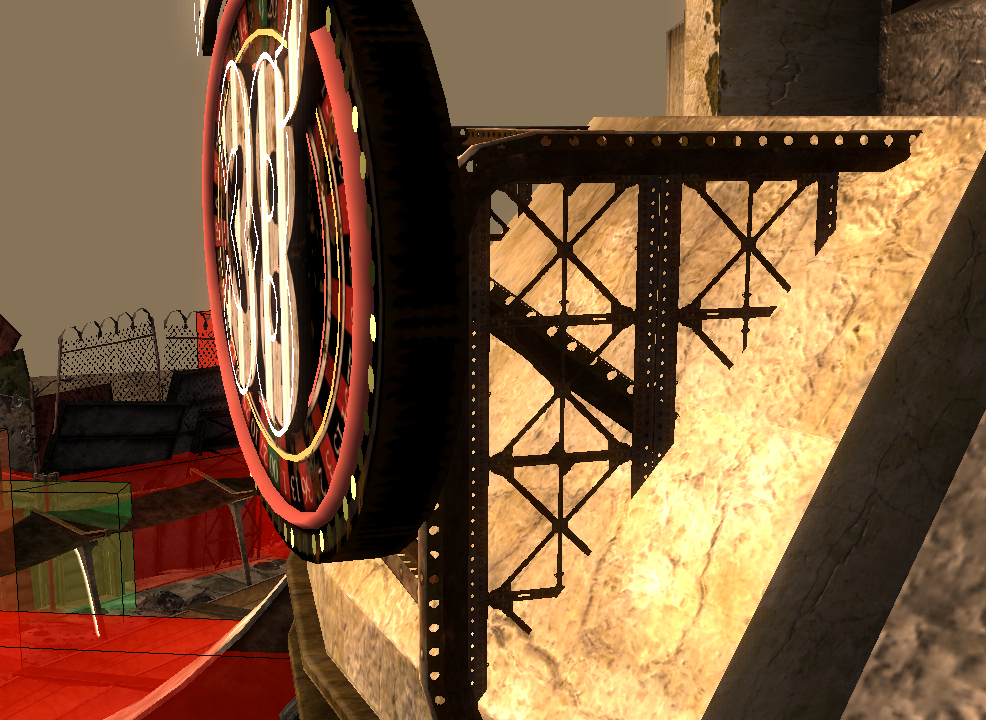
THE HOUSE ALWAYS WINS VI
2/11/2020
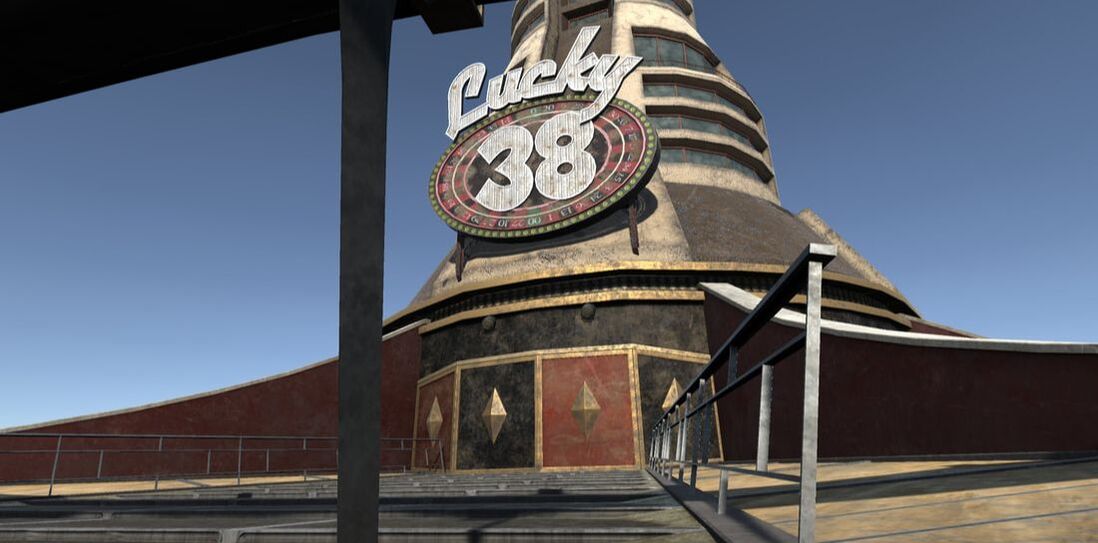
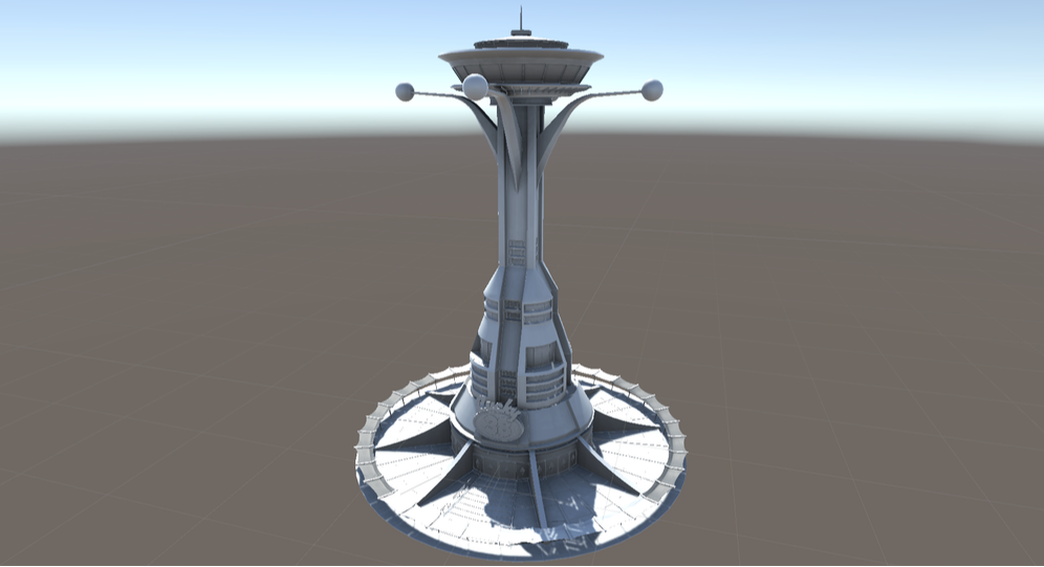
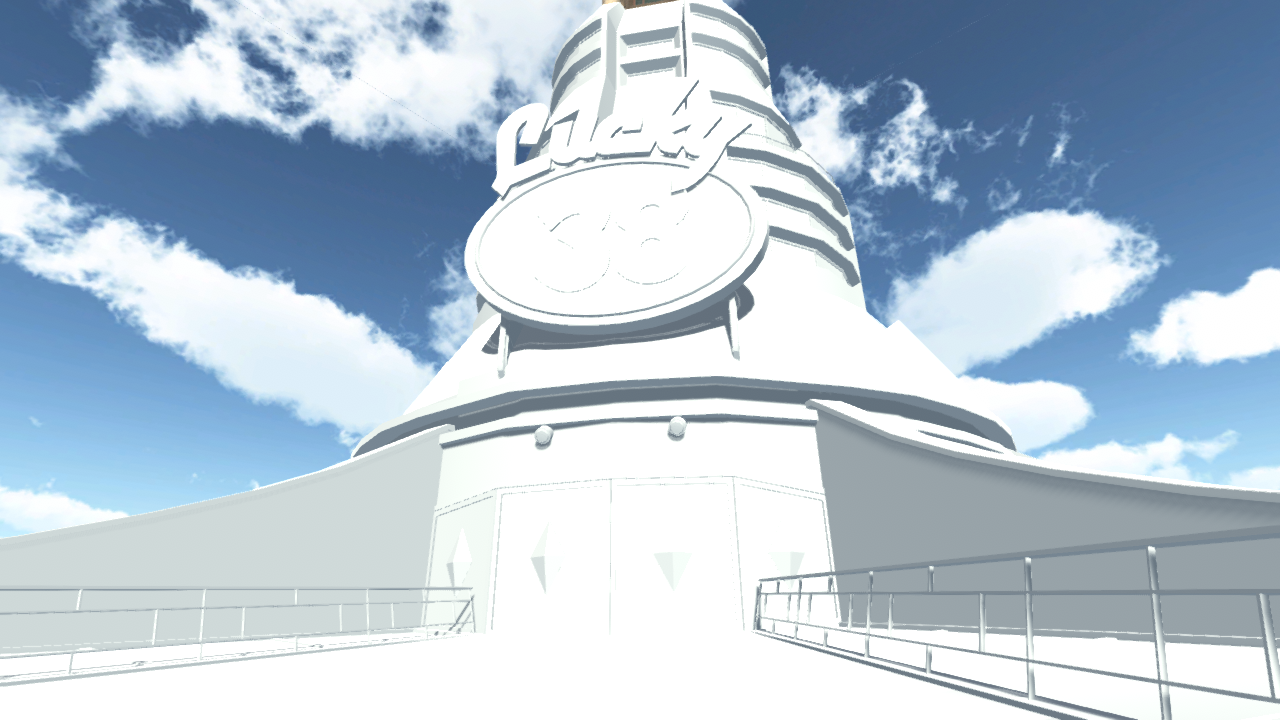
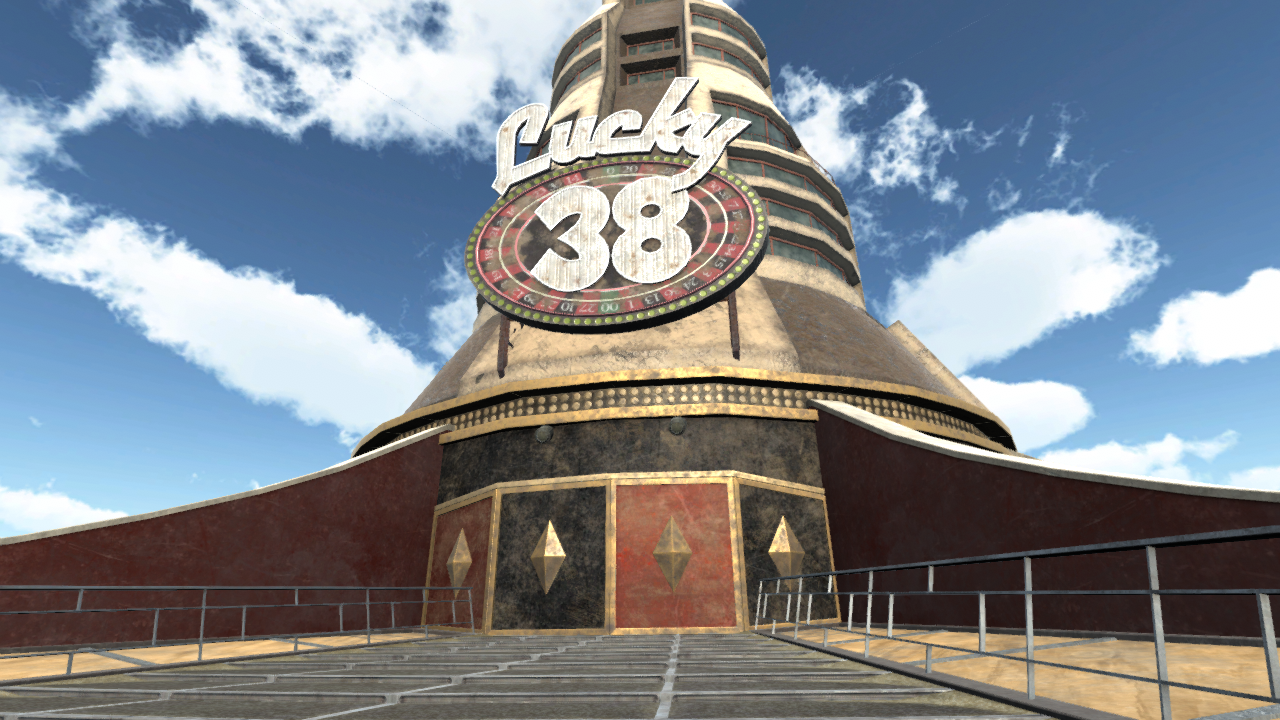
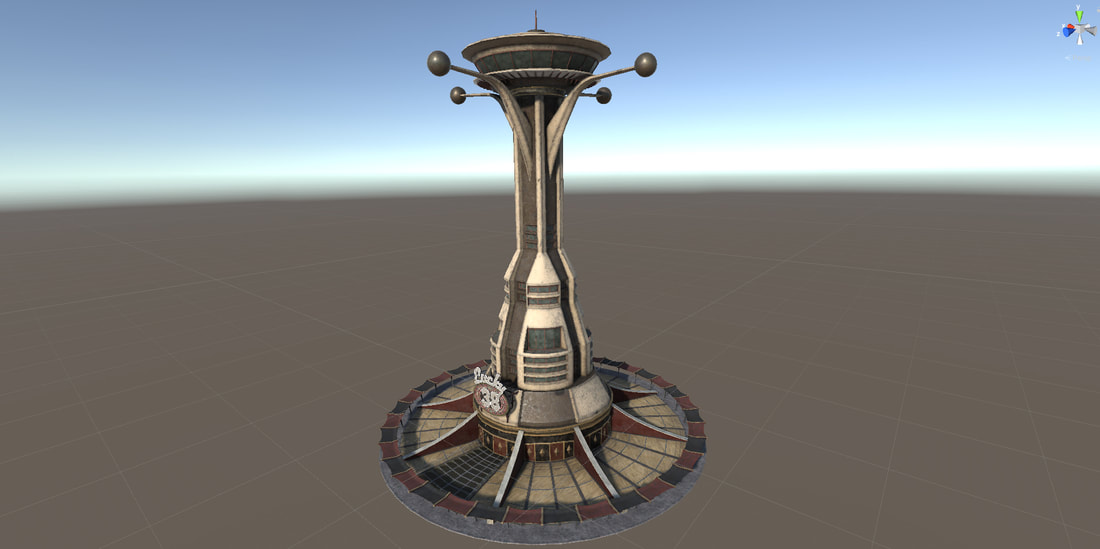
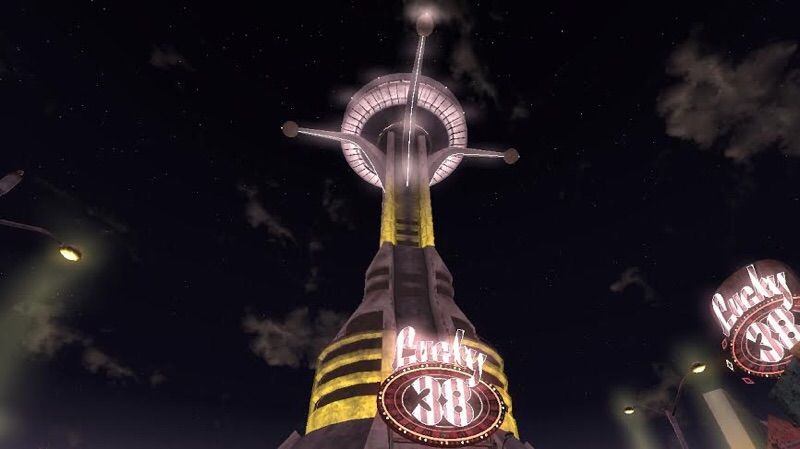
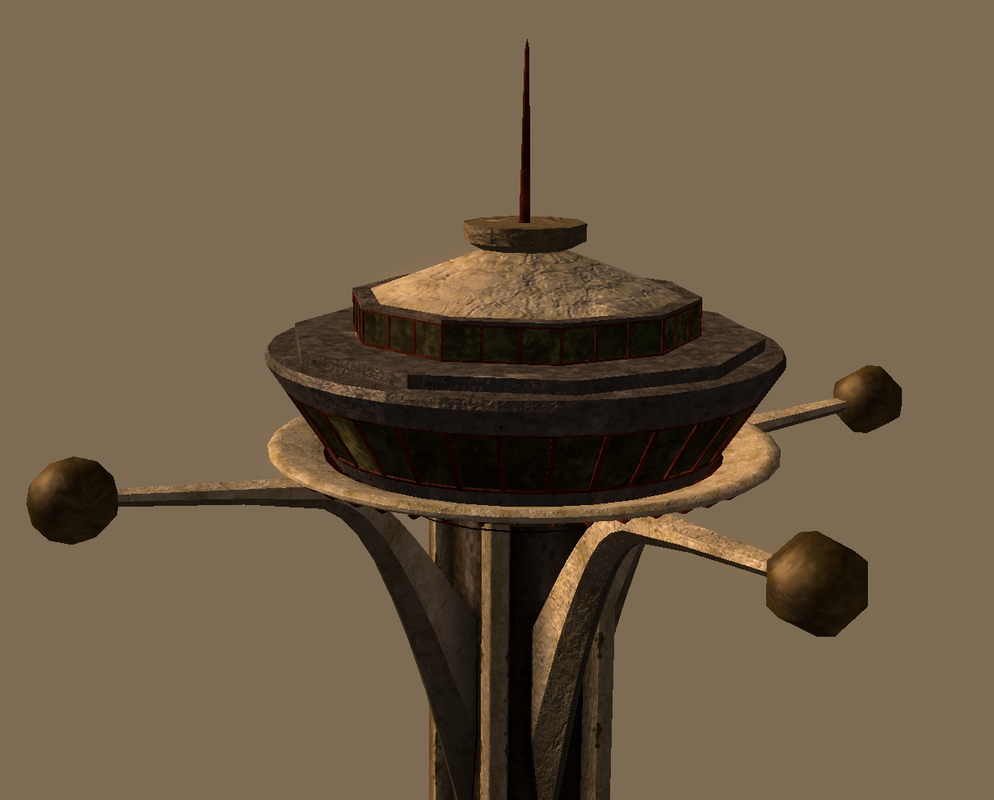
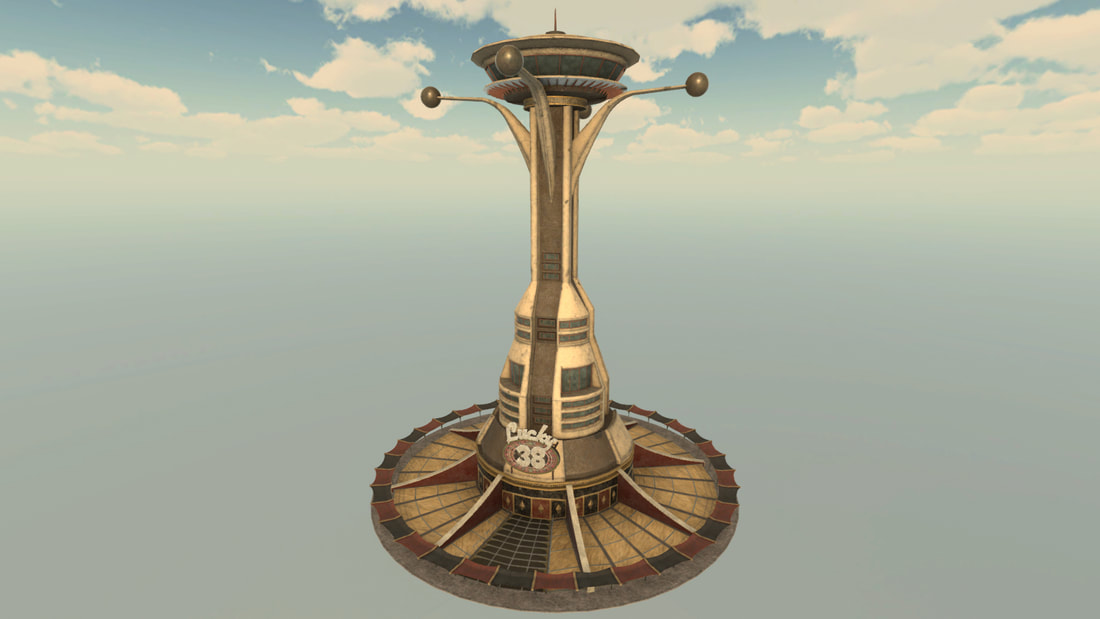 Worked on the Lucky 38 scene (look, lighting, feeeelll). After modelling and texturing the Lucky 38 building, I went straight into improving the look of the scene. I found some old Unity skybox images (from Unity 5's files) and chose one from there. Created a 6-sided skybox and imported them in. Thought the scene needed more colour, specifically the lighting, and trying to get as close to as how the in-game environment looked (in Fallout: New Vegas). I decided to not only mess around with light settings, but also use Unity's Post Processing Stack (v2) to help me achieve the look I was going for (more orange/tinge-desert/wasteland look 🏜️).  skybox used I didn't go crazy with the post processing effects and add every single option available to it (like I have in the past 😳). I added only 3 effects. I increased the intensity of Ambient Occlusion (a small fraction), added a Bloom effect and Color of that effect (cream color), and also added Color Grading. There I added a Color Filter (cream color), increased the Saturation (by 5) and increased the Temperature (by 5) to look 'warmer'. (The word 'color/colour' is the theme of this paragraph! 🌈) 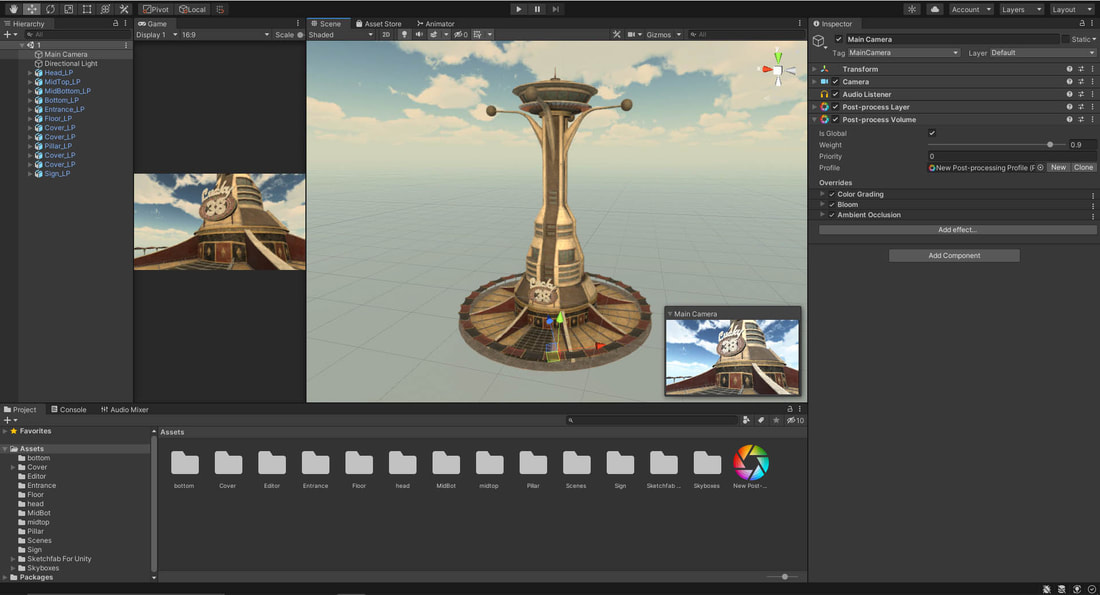 In Unity: scene with Post Processing Stack being used I also wanted to create a 'mock up' (⬅️ if that's even the word for it), which was to create an image that would depict how the model would look in game with UI (HUD). which was basically just going on Photoshop adding the screenshot and slapping the Fallout: New Vegas HUD on top of it.
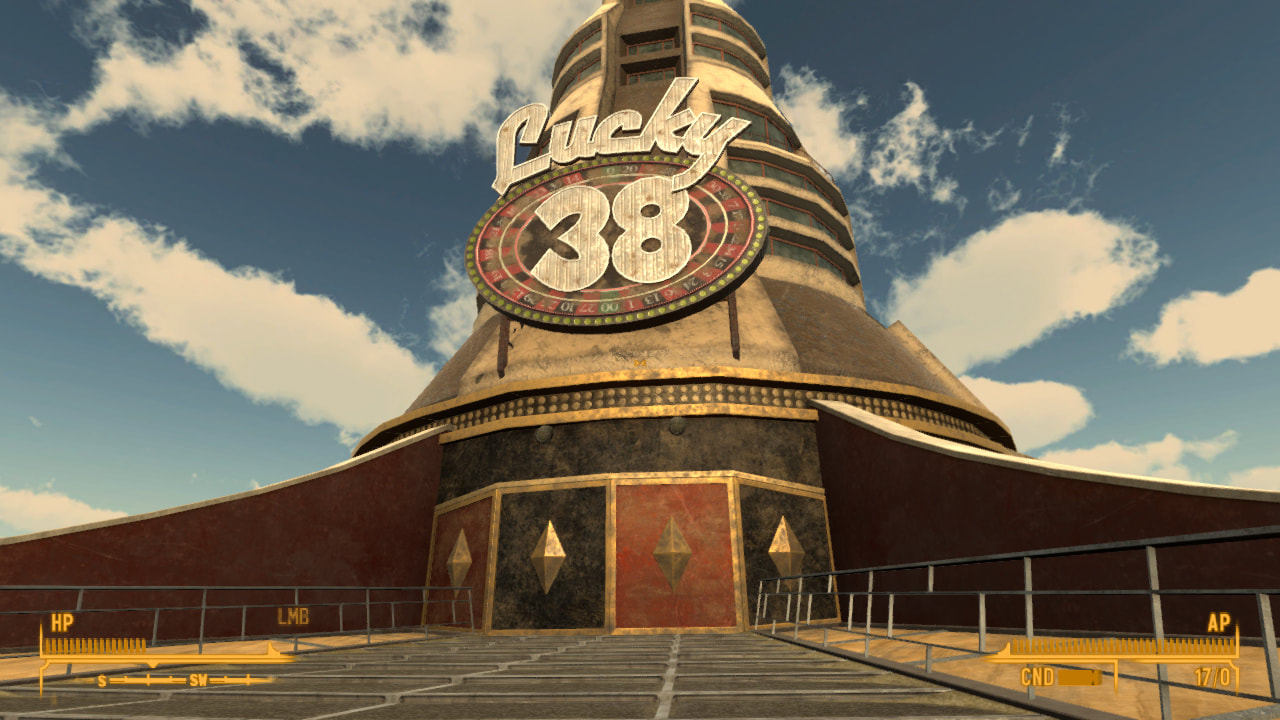 mock up Fun Fact (well... not really fun, but anyway...): I made the image size of the 'mock up' 1280x720 because that's the first resolution I played the game (New Vegas) in back in 2010. 🤠
THE HOUSE ALWAYS WINS V
27/10/2020
 Finished texturing the Lucky 38 model. (Also, Happy Birthday to Fallout: New Vegas! 10 years old! 🎉) First off, ten years ago I bought a game that blew my mind (🤯) and I've never been the same since (plz help 😟). That game was: Fallout: New Vegas. Who can forget? A Fallout game that stood up to the prestige and quality of the first Fallout game, even the second, and/or even Fallout 3. 10 years on and I still remember getting shot by Benny for a platinum chip that I was holding, walking out of Doc Mitchell's house and into the world of the Mojave Wasteland (Goodsprings first), dodging bombs trying to get to Nellis Air Force Base, and even being creeped out by the White Glove Society and their dark secrets in the Ultra-Luxe casino and hotel 🍴. Anyways... Texturing the model took some time. It was on the job learning with Substance Painter. This is the second time using it for texturing/painting an object that I modelled and I did an OK job of it if I do say so myself (previously used Quixel Suite to texture models). Not the best work, need to improve. Keep moving forward, as they say (who's 'they' you ask? got no clue. But nonetheless, getting better and improving my skills is the point I'm trying to make 😵). 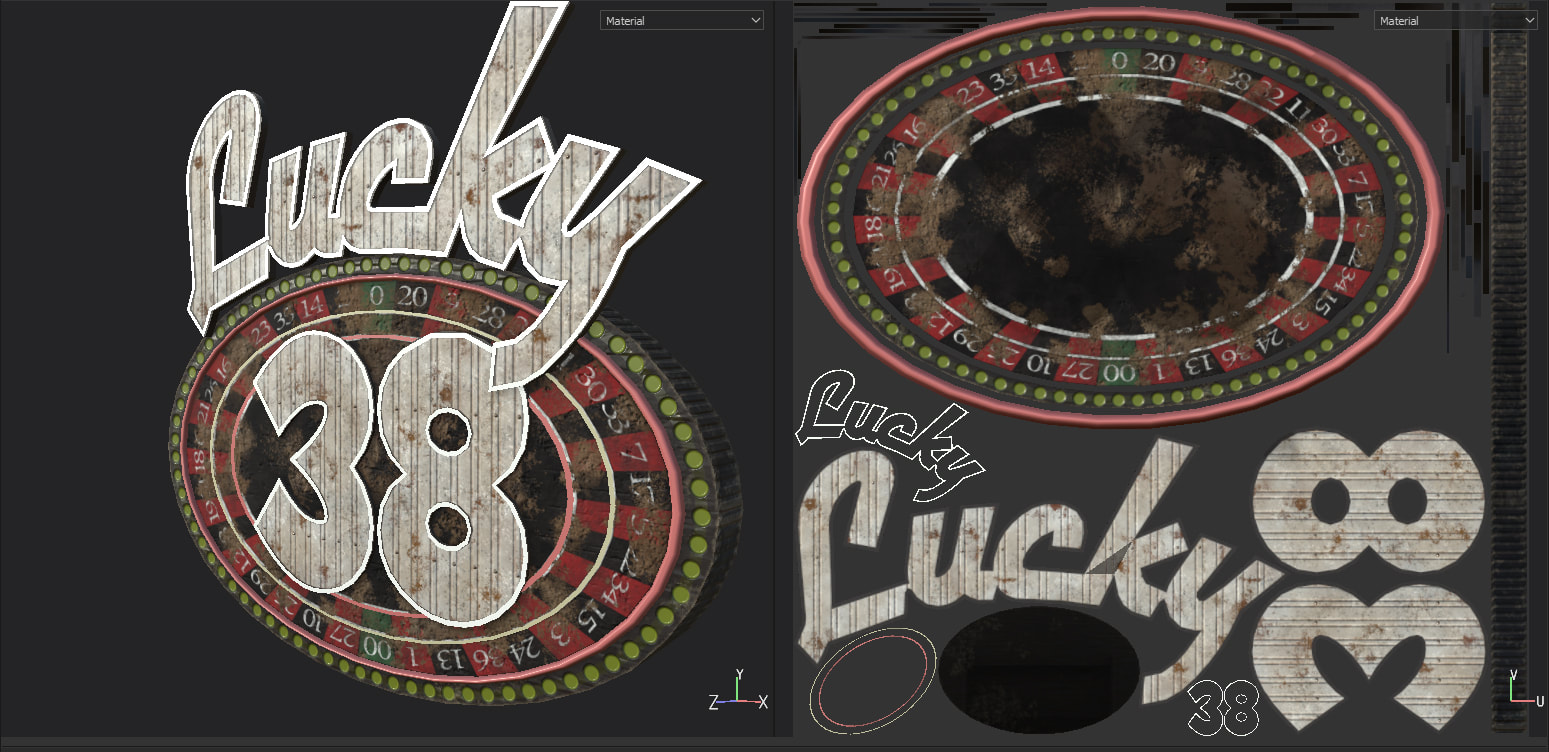 Lucky 38 Sign in Substance Painter (PC struggling to run with all the layers that stacked up) The model was split into sections for the texturing; the top piece was done separately from the bottom, for example. Would have done things differently looking back. Which would have been having the UV's for different parts of the model be separate. So, the railing could've had its own UVs instead of being clumped with the bottom floor UVs. It would have created more space for other parts of the model and the texture quality would've been improved slightly.  Textured the model in sections PC struggled a bit when loading or even sometimes saving files in Substance Painter. With all the layers that I added to each section of the model, it nearly became too much. Hiding some layers that I wasn't working on at the time did help a bit though.
To get the textures as close as possible to the ones in the actual game. I kept switching back and forth from Substance Painter to reference pictures of the model used in game. Most references were screenshots I took from the G.E.C.K. editor that comes with Fallout: New Vegas on PC. Photoshop and image color pallet sites helped me a bit with the colors, but even then, I had to sometimes go with my eye and my gut still (, and my heart 💘). Next up is either creating a skybox or using a pre-made one and working on the lighting of the scene. Something that resembles the orange/yellow tinge lighting that was used in game ☀️. ♥️♠️♦️♣️
THE HOUSE ALWAYS WINS IV
25/3/2020
 The initial ambient occlusion & normal maps are done. Instead of having every 3D objects' UVs (of the Lucky 38 building) fit into one space, I divided them up into pieces. The top 'hat' of the building has its own, the middle, bottom, and the floor (also the sign has its own as well). I started with fixing all the normal maps of each 3D object that needed fixing in Photoshop, and then went on to editing all the AO (ambient occlusion) maps afterwards. This took some time, and when I say 'some', I mean a lot/tons/heaps (/a bag full?) of time. In the game Fallout: New Vegas, the 3D asset in-game is a bit different from one in the intro cutscene of the game, as well as looking at the building from far away as the player in game. In regard to the lighting, the cutscenes and at night, the building has lights that are attached to multiple places of the building. In the game's G.E.C.K. toolkit, the lights are not attached to the asset of the building.
Right now, my plan is to work on the textures of the building, and then start work on the lighting afterwards. I'm thinking of choosing the lighting of either the in-game day or in-game night lighting of the asset. Time to stay indoors, stay away from everybody, and begin painting textures onto the asset. 🎨 Image References
Fallout: New Vegas 2010, Obsidian Entertainment, Bethesda, intro cutscene. Fallout: New Vegas 2010, Obsidian Entertainment, Bethesda, Lucky 38, Fallout Wiki, viewed 25 March 2020, <https://fallout.fandom.com/wiki/Lucky_38>. THE HOUSE ALWAYS WINS III
17/2/2020
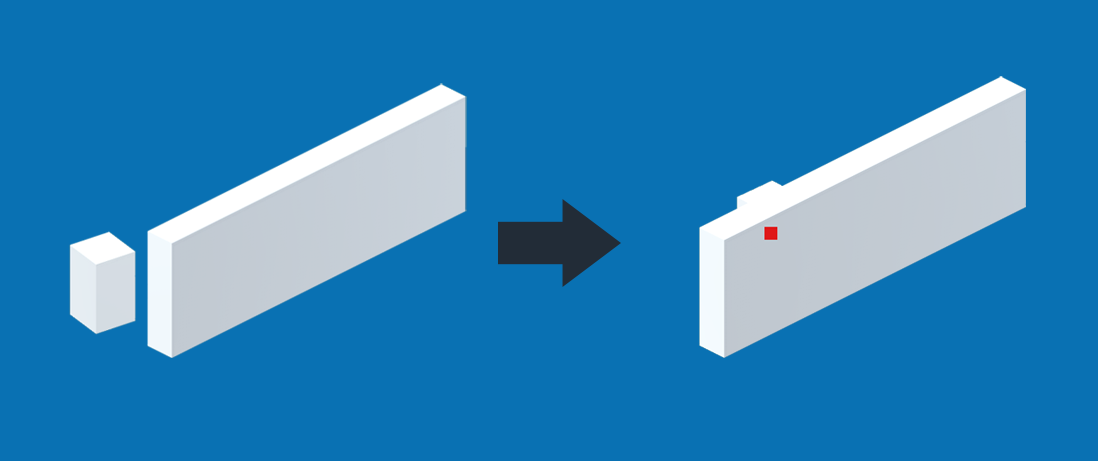
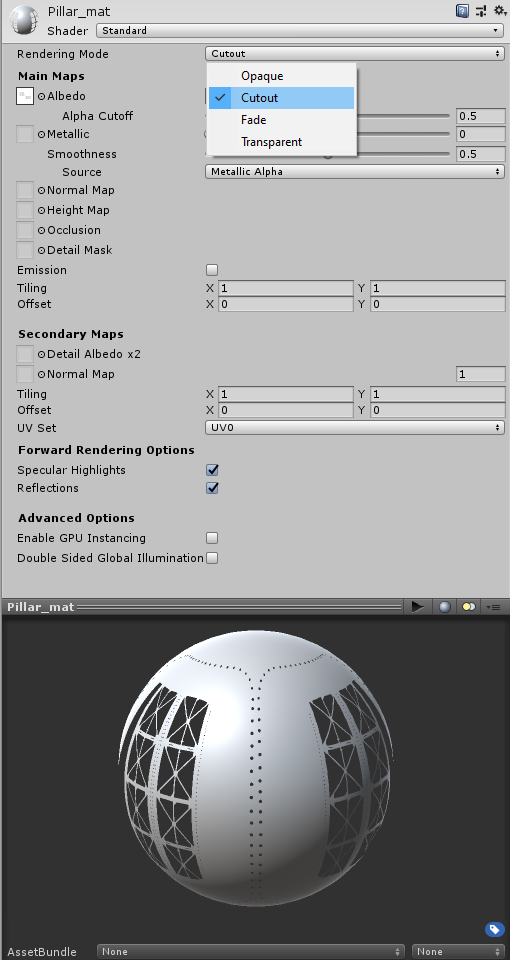
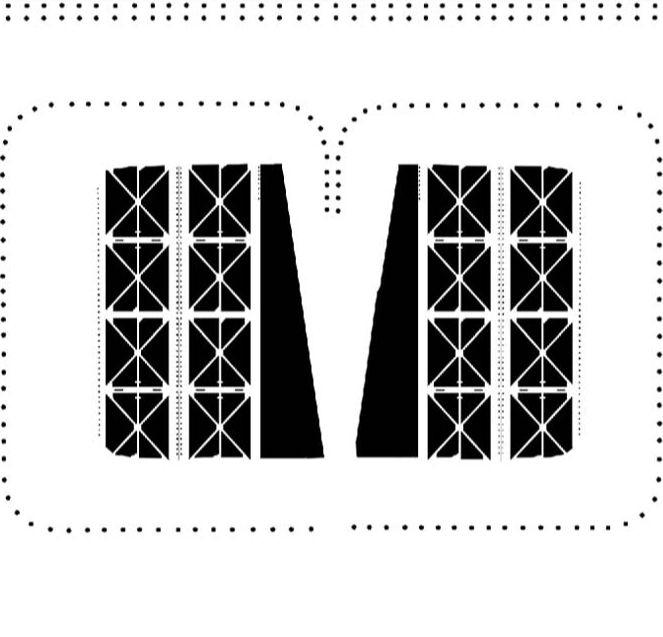
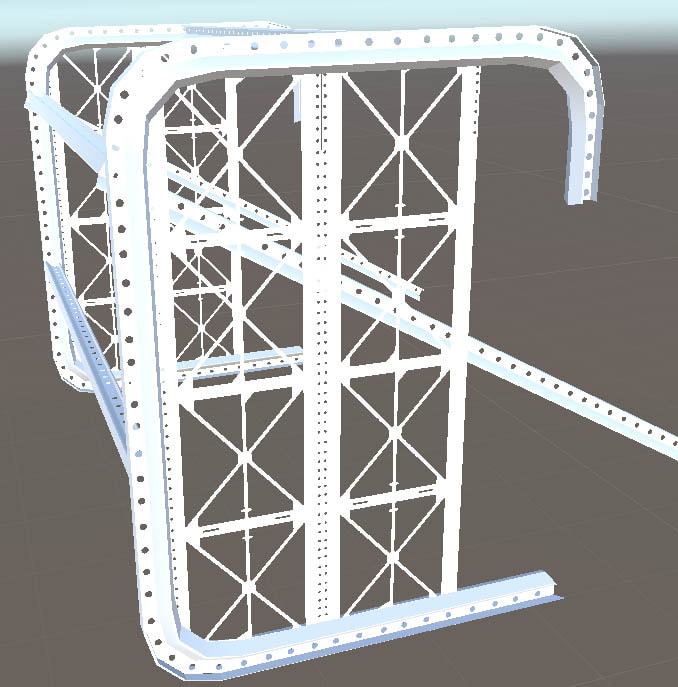
 One of the things that I wanted to get right with this model (The Lucky 38 Hotel & Casino seen in Fallout: New Vegas) was the small detail on the object that 'holds up' the sign. I've had some problems with Unity in the past when wanting pieces of an object to be somewhat transparent or completely invisible, but in this case, surprisingly, it was very simple 😵. Instead of modelling all the small details, multi-cutting, adding more polygons and waste precious computing memory and time ⏱️, I decided to just create a flat mesh, and make an albedo/texture map that takes into account its alpha channel. The 'alpha channel' is a colour component that represents the degree of transparency or opacity of a colour. And in this case, will be used to make part of an objects mesh completely invisible to the naked eye (and... I guess... a clothed eye as well 👕). After creating the UV map for the object, I used a snapshot of it in Photoshop (the Adobe kind) and began to create the shape I intended the viewer to see. After shaping it out (as seen in the pic below (the black part)). I then selected all the white parts in between and in the alpha channel, I 'painted' them black. I also painted the dots around the sides black as well (seen as pink dots in the pic below). Why black you ask? Well son, in the alpha channel black means completely transparent, while white means it will not be transparent 🙃. And anywhere in between those two full colours, will create a degree of transparency. In the picture below, I made the Red Channel and Alpha Channel visible, while the others hidden. The red-ish pink is the alpha channel shining through, and those parts will be transparent.
After that, I hid the shape I created (once again, the black part, in the pic above). Now the albedo/texture map is now completely white, but the alpha channel is still there (in the background, waiting, watching 🕵️). I saved the file as a .psd Photoshop file (I've had previous trouble with .png files and Unity when it comes to transparency and alphas. But maybe I'll try it out, see if it works), I then imported the file into the Unity game engine, dragged it onto a material, and changed the rendering mode on the material from Opaque to Cutout. Now the alpha channel is taken into account and voilà! Opacity levels in effect.
P.S. The 3D model in these pictures were the colour red to make the small details more visible. THE HOUSE ALWAYS WINS II
29/12/2019
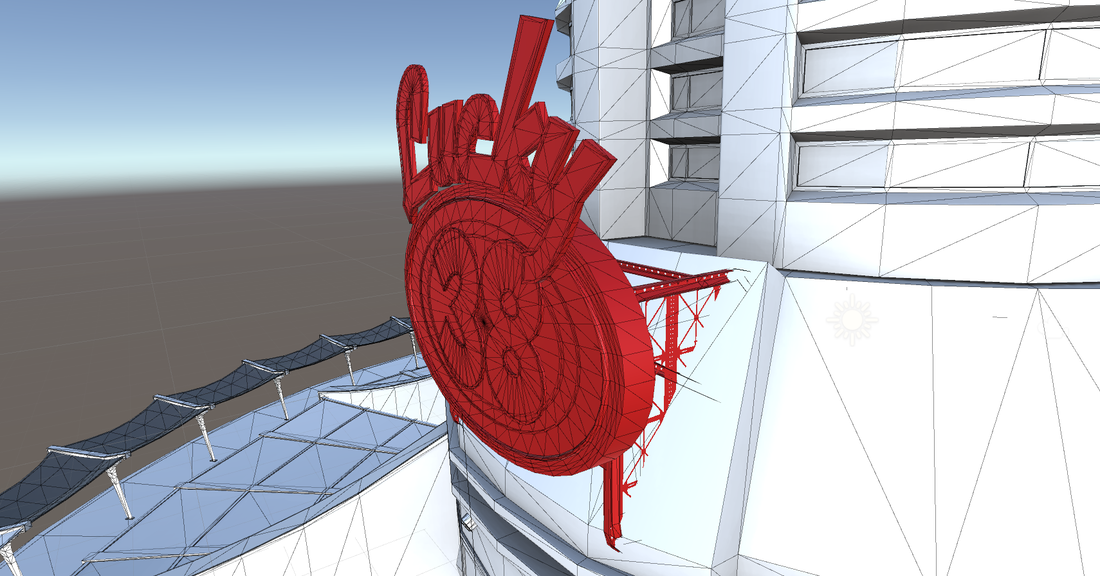
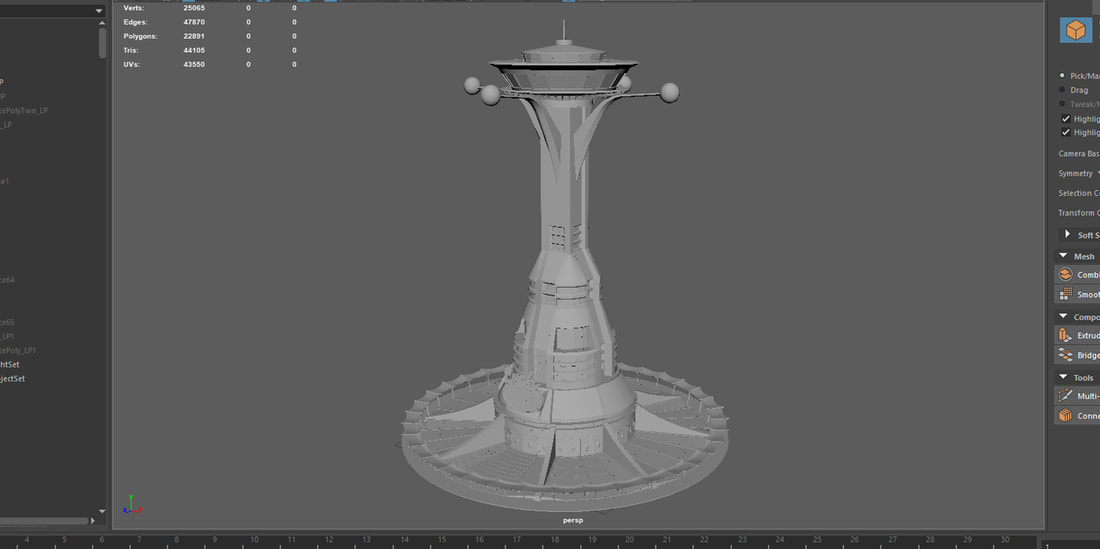
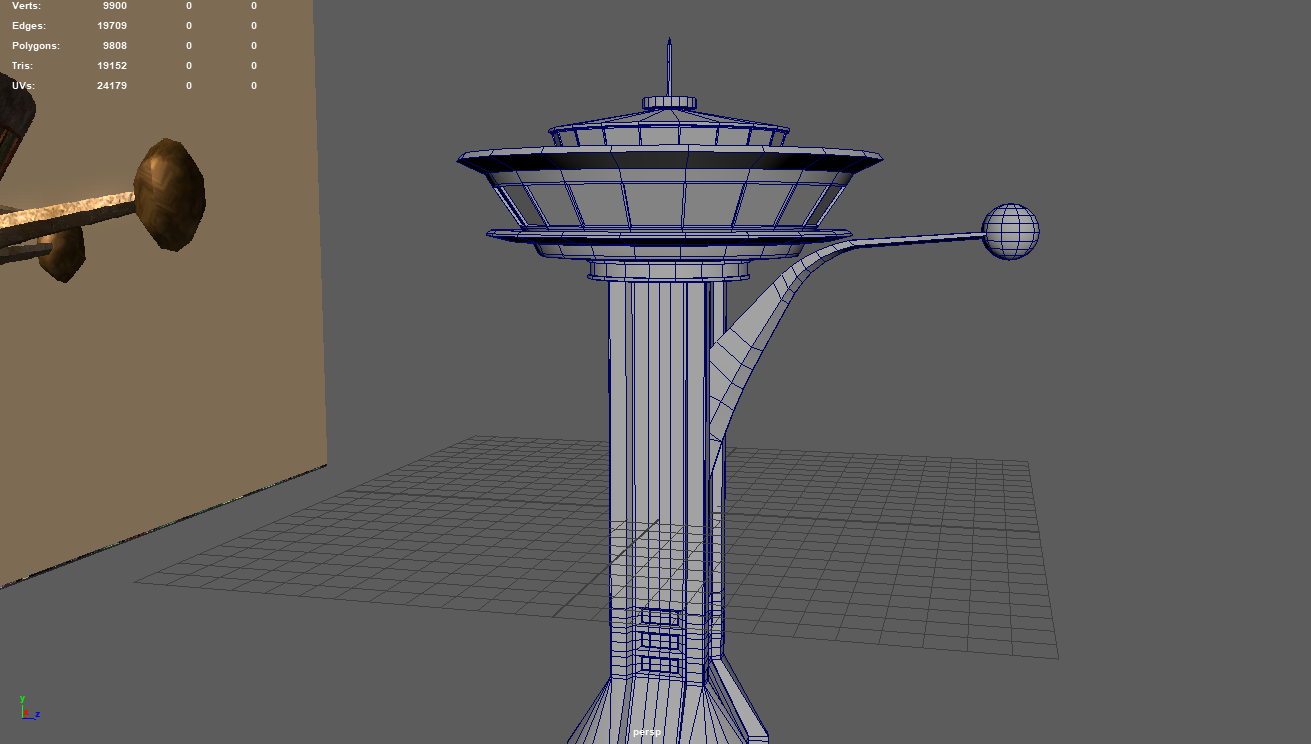
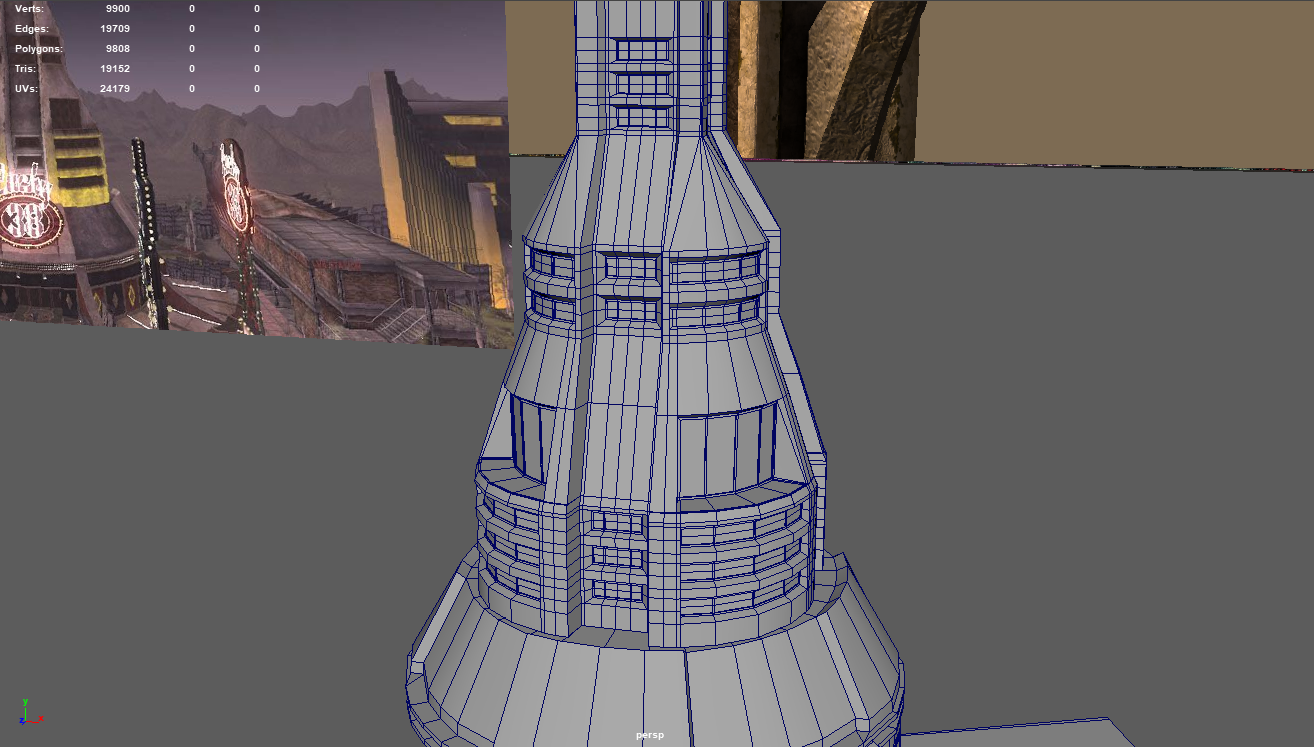
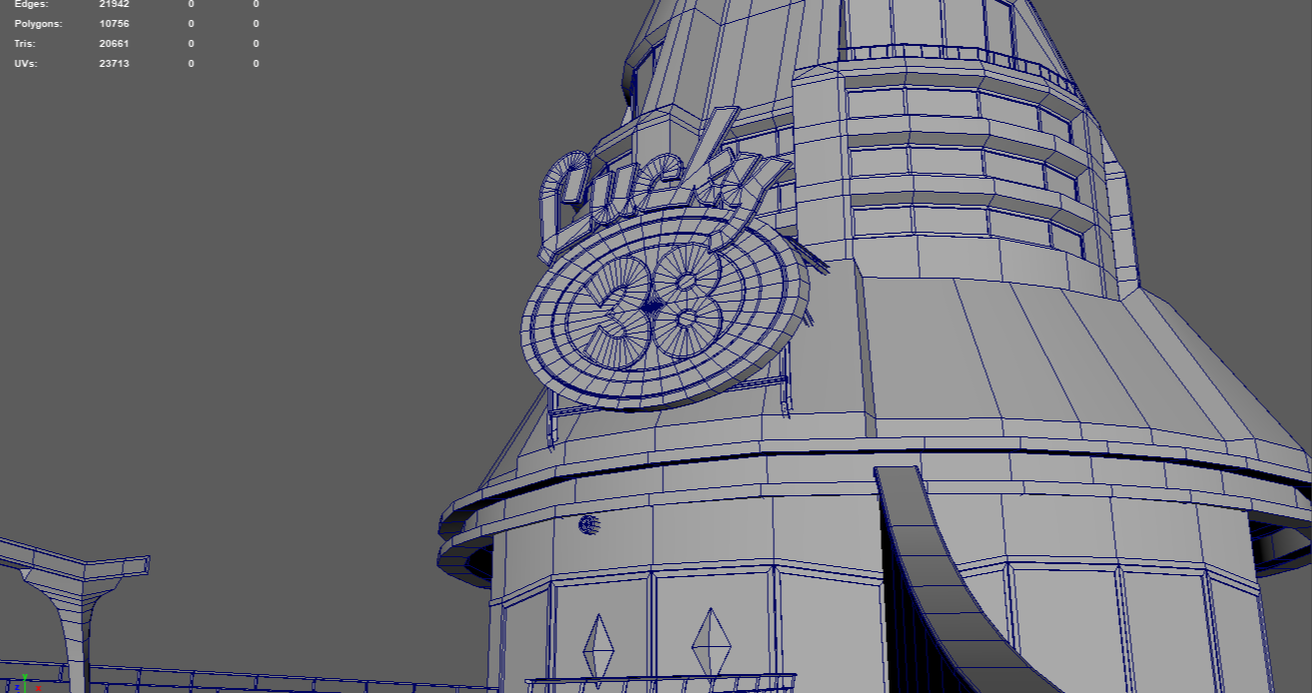 Finally finished modelling this bad boi ☝; The Lucky 38 Hotel and Casino (at least the first version of it). Also be prepared to see a lot of grayscale pictures of a 3D model 😞. Well, maybe not finished yet... I might create simple shapes in Maya for the light sources (of the lights on the building), Making those created models emit light in the Unity Game Engine. But that's way down the line. All other pieces are modelled. Instead of modelling the whole building, I decided to just create pieces of it. Being a 'round' building and all, I can just centre the pivot of each object to the centre of the building, duplicate and then rotate it to fit in the empty spaces. This helps cut down the time of the UV unwrapping/mapping, and also leaves more room on the UV map for more detail to put on the texture maps. 'Large' pieces of the Lucky 38 Building For the Lucky 38 sign, I found two fonts (on dafonts.com. Links to fonts at bottom of blog post) that resembled the fonts used in the actual model in-game (Fallout: New Vegas). So, I downloaded 'em and installed 'em! And Jumped on the old Abode Illustrator train (and rode that shit till the sun went down! ... Too far? ...probably... anyways,). I just used the default Font tool and wrote 'Lucky' and '38'. Saved them as Illustrator files (.ai) and then went on the old Maya train (and rode that shit til--... I'll stop...). Maya lets you import Adobe Illustrator files and turn them into 3D objects made of polygons. After spending way too much time cleaning and decreasing the polygons on each text model, I used a Non-linear deform called Bend on the 'Lucky' model. The bend deformer does what it sounds like it does; bends shit. Bent it just enough to sit on the 'backboard' of the sign (︵). Something I got to look into is having/showing two sided faces, so that it can be looked at from the front and back. As you can see in the images below, I'm going to try to make the 'side-middle' part of the sign just be faces and make the gaps (as seen in the in-game model) transparent. It's the double-sided face problem that needs solving (so it can be seen from both front and back, not invisible when looking at the back of it. I read somewhere on the interwebs that Maya has an option to make faces double-sided, but I don't know if that will transfer over when importing to Unity. Unity might have an option similar to this, or I might need to research into creating a shader that inverts and shows the model's faces as double sided. If push comes to shove, I might just duplicate and invert the model, or even extrude out the model to make it 3D. Lots of testing to be done either way!
The 'low poly' model (if you can even call it that at this point) is made up of just above 10,000 polygons! (Je - fucken - sus) Which is the model I will be primarily using. The high poly model is over 42,000 polys, which will be used for the initial detail maps (ao, normal). I also plan to create LOD (Level of Detail) models. So, when the camera is zoomed out and the building is in the distance, the model in the scene will switch with a lower poly model of the low poly model (if that makes sense to you), reducing the poly count. Initially I thought about fitting the UVs of all the objects on one map and making that map size at least 4096 x 4096 (4k), but now I'm leaning towards separating them out, to make sure every object has enough space and detail (they rightfully deserve!). Well, ♫Heigh-ho, heigh-ho, it's UV mapping time, here I go! ♫ 👉 P.S. To make up for all the colourless photos of the model here's a picture of Kermit the Frog on a log, singing The Rainbow Connection (rainbow not shown). ⇩⇩⇩ 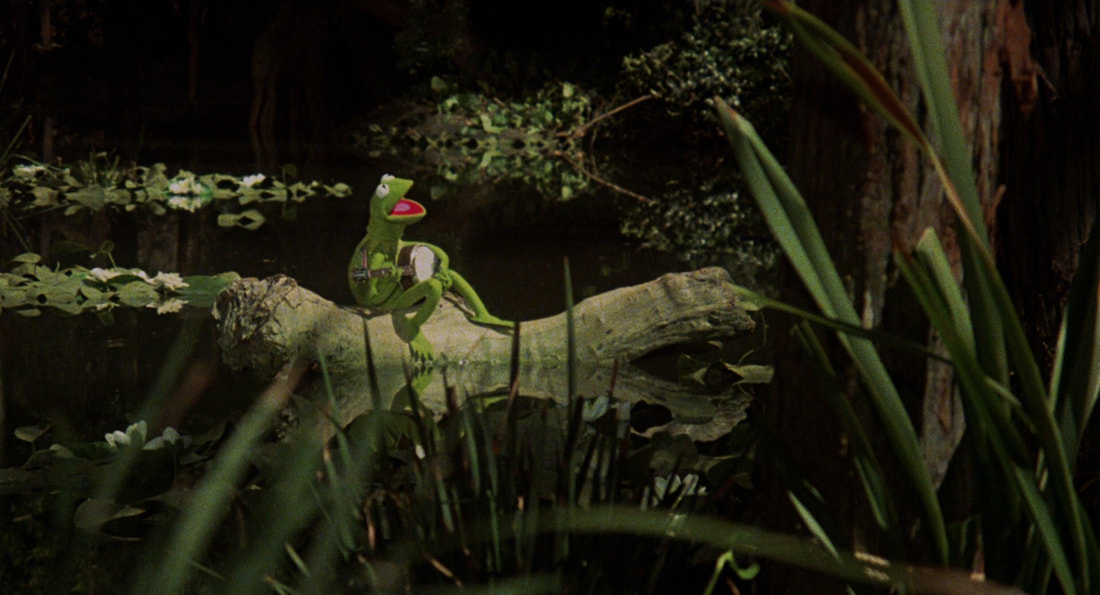 Font References
'Airstream' by Nick's Fonts, <https://www.dafont.com/airstream.font?text=Lucky&psize=l>. 'Fontdinerdotcom Huggable' by Font Diner, <https://www.dafont.com/fontdinerdotcom-huggable.font?psize=l&text=38>. Image References G.E.C.K. screenshots taken from the Fallout New Vegas G.E.C.K. toolkit The Muppet Movie 1979, ITC Entertainment / Henson Associates, The Rainbow Connection, The Disney Wiki, viewed 29 December 2019, <https://disney.fandom.com/wiki/The_Rainbow_Connection>. THE HOUSE ALWAYS WINS I
30/11/2019
 Couple of months back I started modelling the Lucky 38 building seen in the game Fallout: New Vegas. But I put it on hold to complete a 3D asset pack I was working on (Diner Prop Pack - available now!). As of the start of November I've picked this project up again and there's no turning back baby!  (somewhat of a) blocking out I started off this project by looking at some reference images on the old Google machine. Although a good start, most pictures were screenshots of the building from a distance and I needed to get some references that showed the minor details (I needed to get in close 🔎). Images from the world wide web were a good start for blocking out the model, but it was time to get down to the nitty-gritty. I remembered that the PC version of Fallout: New Vegas included the G.E.C.K. (Garden of Eden Creation Kit) toolkit, which allows you to edit and create any data for use with Fallout: New Vegas. - on a bit of a tangent, I remember creating a new skin/material (texture map) for the 10mm Pistol in Fallout 3 with G.E.C.K., and I also changed the damage of the gun to something like 999999. Which was fun for a while, just running around with my custom decked out 10mm Pistol. Those were the days 😢 - So I opened up GOG galaxy on my PC and downloaded my copy of New Vegas. Before continuing with this project, I had to boot up New Vegas just for old times' sake. Took me straight back to 2010 (simpler times back then...). Anyway, after helping the town of Goodsprings get rid of the attacking Powder Gangers (⟵ game reference), I quit the game and opened up G.E.C.K.. There I found a better reference to the Lucky 38 building... It was the Lucky 38 building itself! I took a ton of screenshots from all different angles, but being an in-game asset, some of the pieces were cut off/hidden/deleted. Pieces that were never going to be seen in-game by the player (some of the top section of the building for example). A few screenshots of the Lucky 38 Building asset in G.E.C.K. As mentioned earlier, some parts of the asset were missing (most of the roof pieces), and the top of the building differed from the top of the building from a level in the actual game (example in pics below). So, ended up just looking at the two assets and tried to put them together where they made sense.
 modelled asset The rest of the model was created just by looking at the reference images, and then modelling it in Maya, while listening to Spotify Daily Mixes and Discover Weekly playlists (which by the way, seemed like I was listening to the same songs over and over, So I switched to a Jukebox Jives playlist to switch things up a bit and then I proceeded to do The Twist 🕺.) Current state of my model Currently I'm still modelling pieces of the model (still got to do the front gate and stairs, as well as the smaller details, like the railing near observation points and whatnot.), then try to cut down the polygon count as much as possible for the Low Poly model as well as correct the UVs for texturing. Image References
G.E.C.K. screenshots taken from the Fallout New Vegas G.E.C.K. toolkit DINER PROPS: V - WE'RE LIVE PAL
30/10/2019
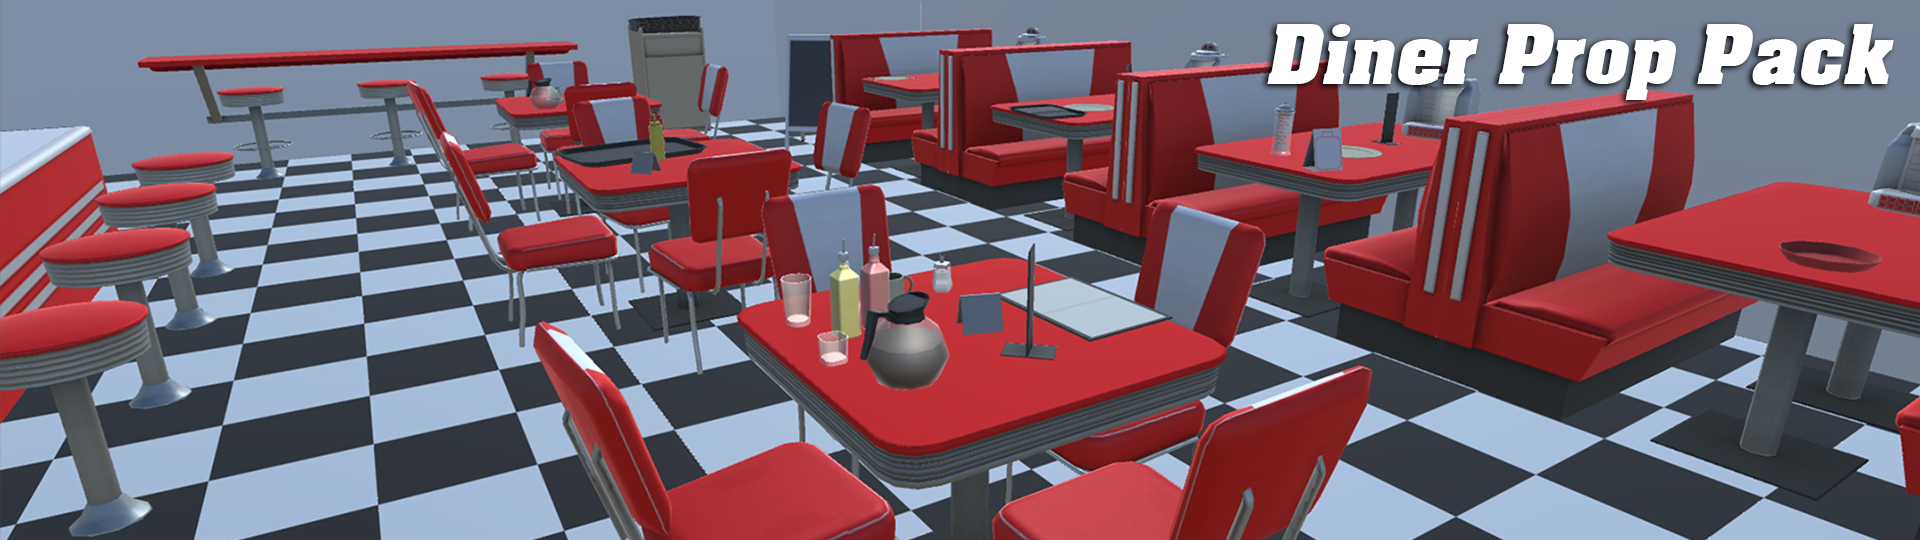 The 'released' blog post (this is gonna be a short one folks) The Diner Prop Pack submission to the Unity Asset Store was successful (So there's that). Initially it was declined because I didn't format the text description correctly on the store page and I also needed to add the poly count of each object in the description as well. But after doing that, I resubmitted, and a couple of days later it was accepted.
Links to Diner Prop Pack: - Unity Asset Store - itch.io DINER PROPS: IV - SUBMISSION CITY
30/9/2019
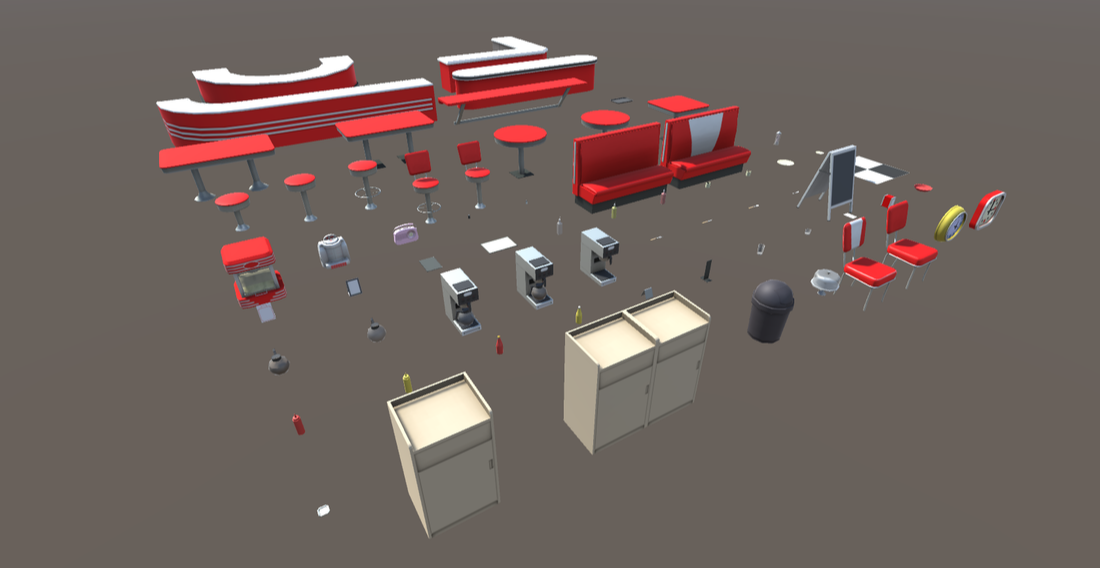 Version 1.0 done. This month I finished modelling the assets needed for the initial release of the asset pack. This 'pack' in Unity contains 67 prefabs, and 3 example scenes. Initially there were going to be more objects included, but I crossed some out due to just wanting to release as soon as possible. I might update the Diner Prop Pack and add some more objects in the future, but for now, this is it (↑). 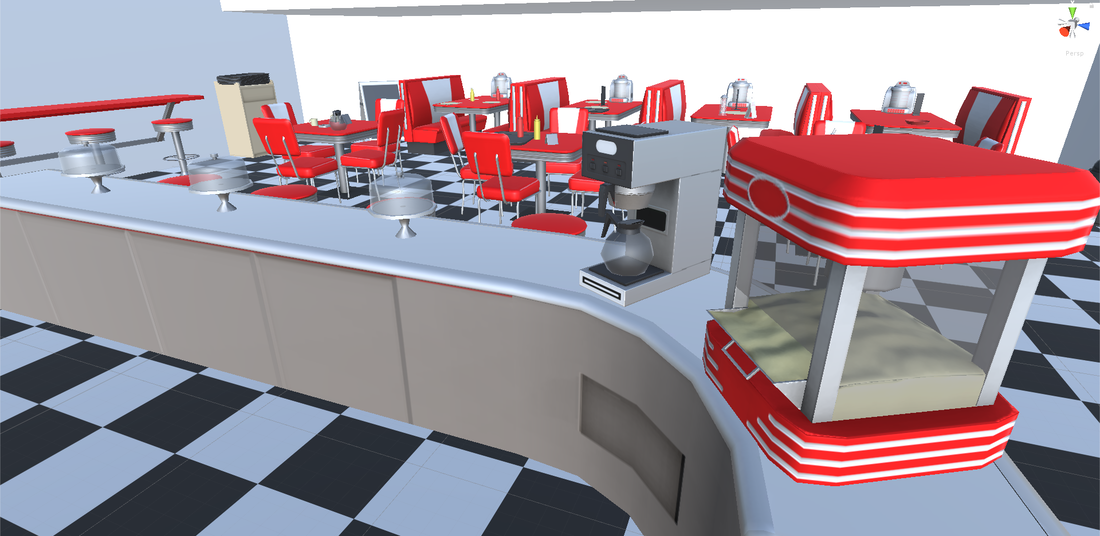 After finishing and resizing the models, I created three example scenes, made sure every prefab had a collider attached to it, and checked if there were any spelling mistakes in the file names. I then submitted the asset pack to Unity to hopefully get accepted and be sold on the Unity Asset Store. The submission included setting up the basic information of the store page (name, description), and also adding artwork to the page as well. 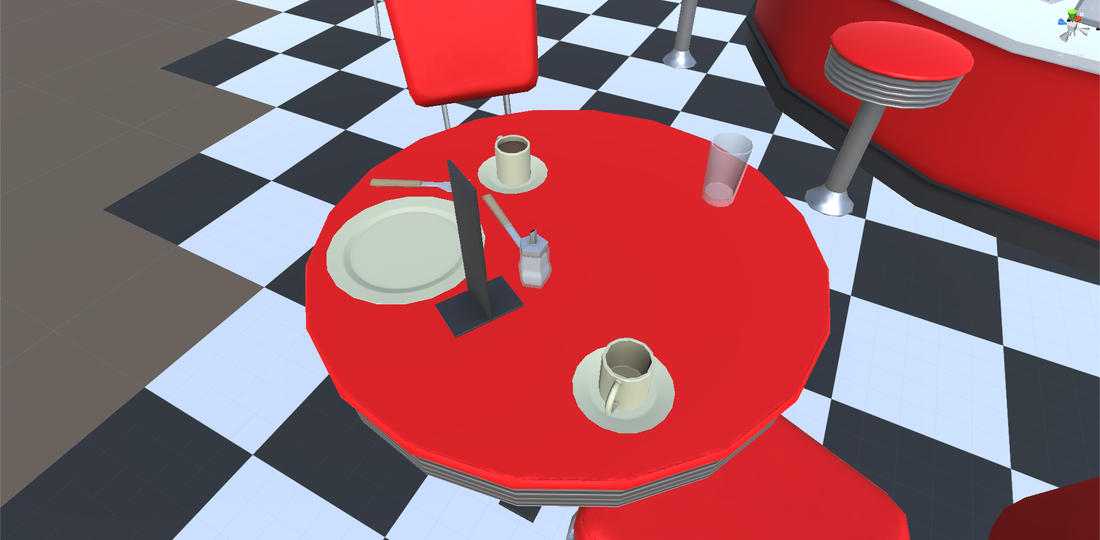 There could be a long wait before they get to testing my submitted work. The Unity Asset Store Publisher employees (😎) need to test what versions of Unity it will work on, check if there are overall errors in importing the pack to a Unity project and also the fact that it said on the web page that it might take some time due to the high demand in submissions. So, what I might do is upload the pack onto my itch.io page as well, so the project isn't just sitting on my computer collecting (digital) dust.
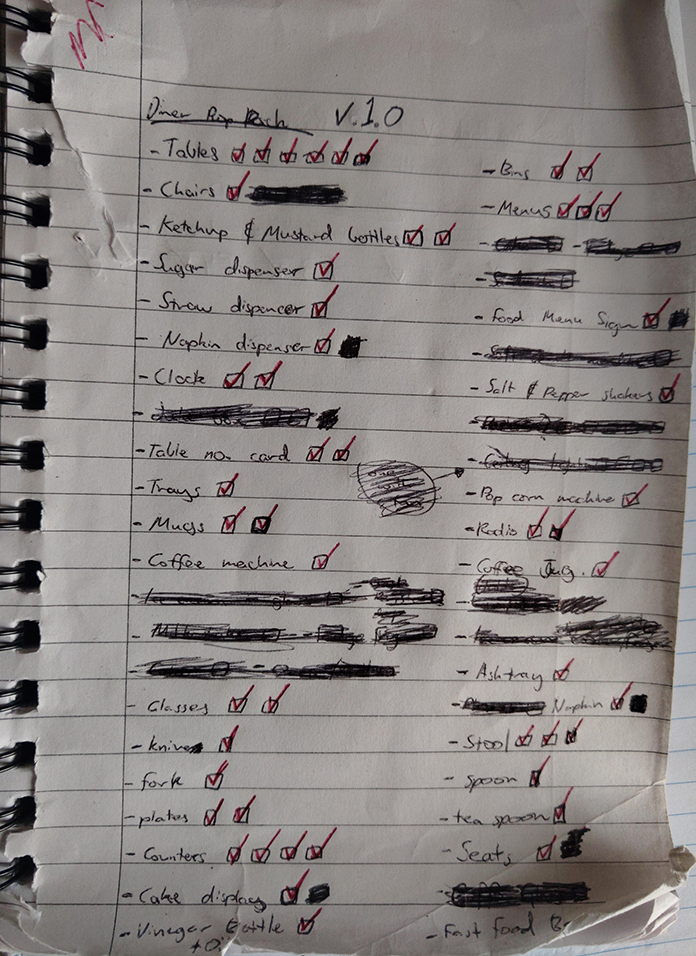
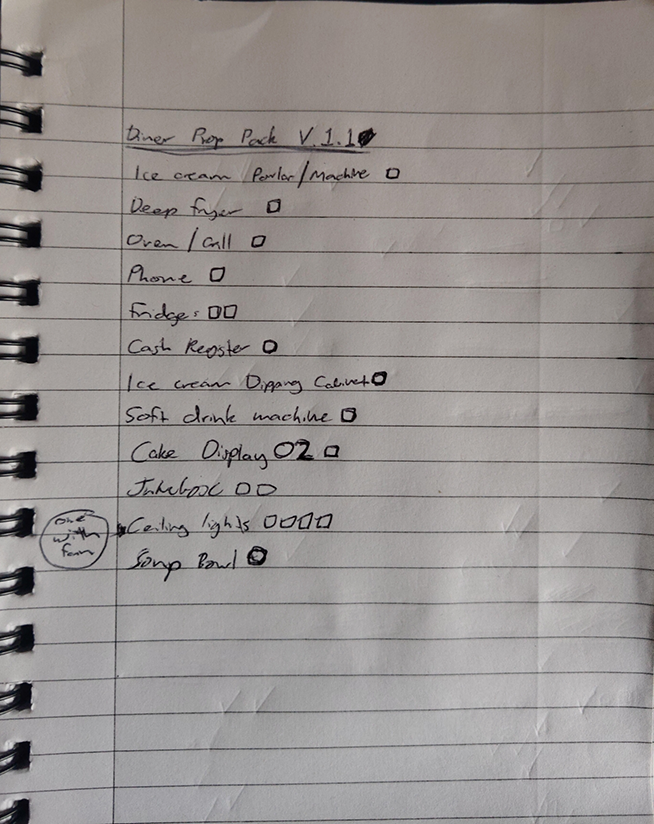
I scribbled out a checklist a few months back, which you can see just above (also looks totally destroyed 💔), which helped me continue working on this project. And, as you can see the next picture contains the objects that I didn't get to model (yet! (maybe. we'll see)). (Also wasn't trying to win a handwriting contest so get off my back OK!) ✍
DINER PROPS: PART III - STILL GOING
30/8/2019
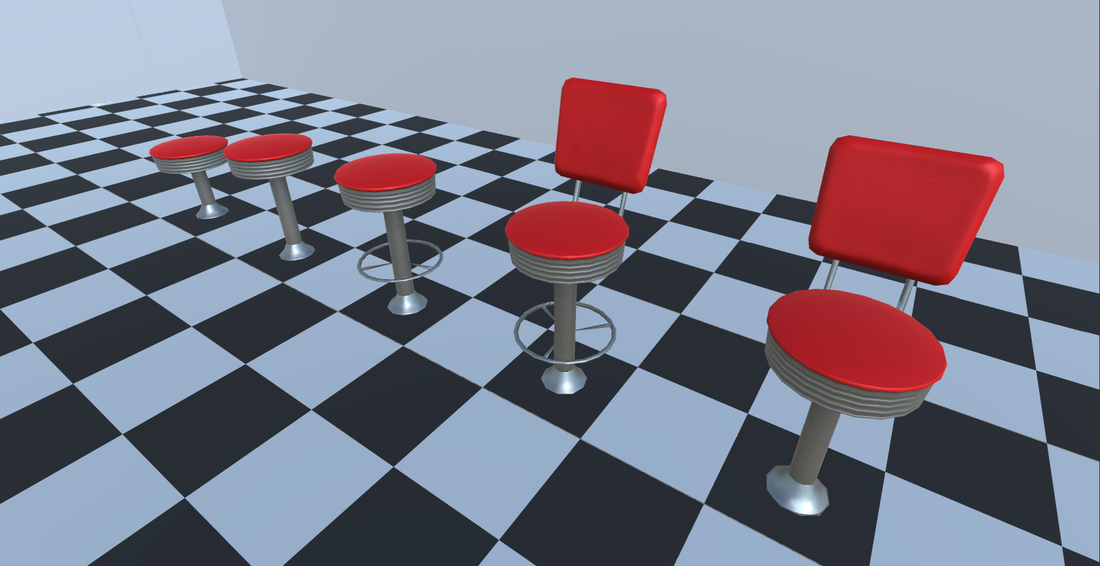
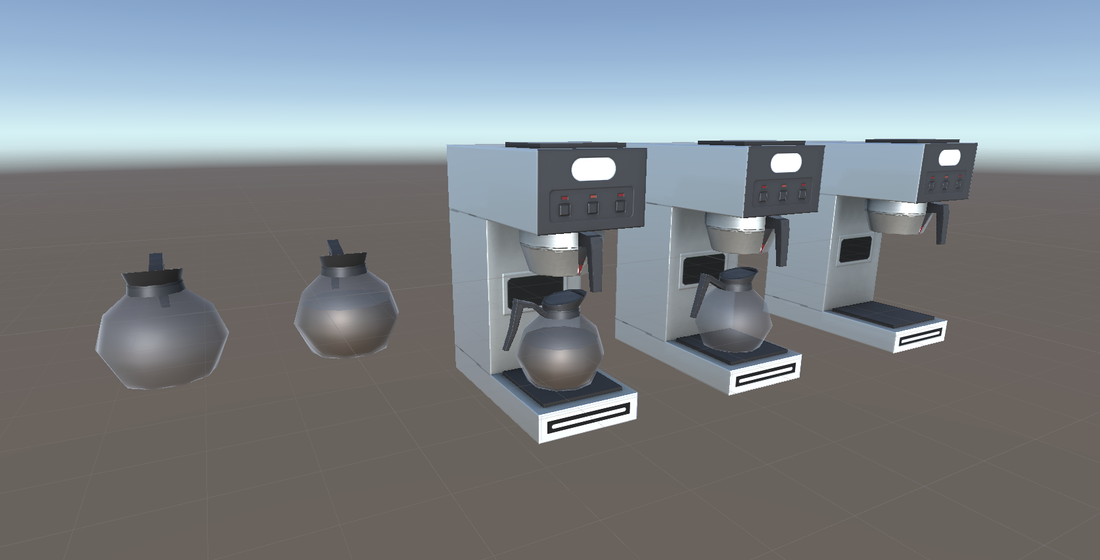
 Yep. Still working on this diner asset pack. This past month started great. I modelled and textured a few models in about a week, which included modelling; stools, a sugar dispenser, coffee machine, coffee jug, popcorn machine, and a food menu sign (WOW! Some exciting stuff! 🔪). But then I took a week off from working on it. I just needed a break.
After recharging my batteries, I resumed working on the project (No Rest for the Living). I modelled a couple of more objects, fixed a few errors in some of the normal and occlusion maps, and also resized some of the assets as well.
I also created some prefab variants for objects (pics above ↑), which saved me some time, having not to model any new pieces. I just changed the appearance by adding or removing pieces from each model and/or creating different textures (albedo maps). To get this project finished, I crossed a few items off that I won't be modelling and aren't essential to this 'pack', well at least for 'version 1.0'. I just need to finish this project as fast as possible at this point. I've only got a few more objects to model, and then I'll start getting the package ready to upload onto the interwebs (😎).  There are so many projects that I have started, never finished, and moved on to working on another. But for this project, I painted myself into a corner in the best possible way. I've created all these models (↑), it would be stupid to stop now, scrap everything and start a new project. So, the adventure continues...
DINER PROPS: EPISODE II - CTRL + D
28/7/2019
 Just been modelling assets this whole month. That's it. End of blog post. Goodbye. Take it easy. Au revoir. Auf Wiedersehen. (I joke 😊) After modelling and texturing a few more props, I decided to start planning out a diner scene with the models already made. The above picture (⇧) is the initial layout of the scene, and will probably be changed in the future, to comply to an example of a level that could be in a game. Making it more focused and thinking about what the goal is for the player in that said space. (Also, the lighting of the scene has not been worked on, so don't judge the lights Sonny Jim!) Off the bat, the scene has helped with what the scale of each object should be. I tried scaling them as close as possible in Maya, but when importing into Unity, some just needed a little adjusting. I'm planning to put some more time into resizing some props when all the models are finished and imported into Unity, and then freezing each of the adjusted objects transform components. Even though I'm trying to scale them to a reasonable size when working on them as I go.  During modelling in Maya, I figured out for this pack of assets, it helps to model the low poly object first and then the high poly afterwards. This helps me keep the poly count to a minimum. For some models, I started creating the high poly first and then by subtracting edges, faces, and vertices, I ended up with the low poly. But doing so, the assets still ended up having a lot more polygons than intended with the final low poly model. I also need to keep in mind that some of the smaller objects don't need to have little details extruded out in its low poly model. The object will be looked at from a distance and not inspected from a centimetre away. 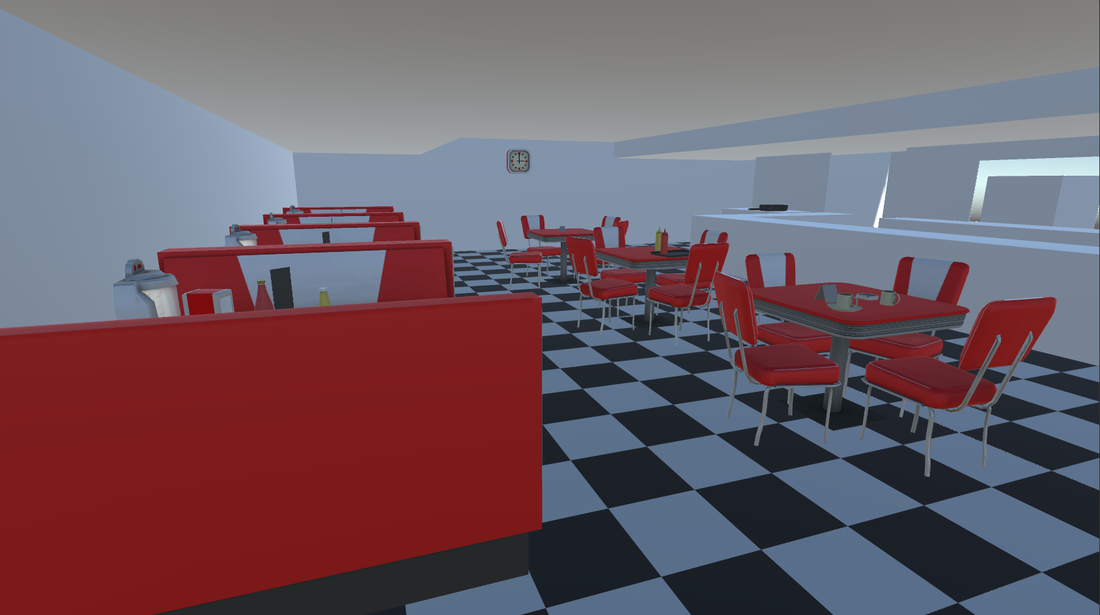 Also, a tip: When creating assets, YouTube and/or TuneIn radio (or even Spotify) are your best friends. You start listening to a 60s ,70s or 80s radio station on TuneIn or a Top 100 songs playlist on YouTube... mate. In the words of the band Starship... "Nothing's Gonna Stop Us Now".
3D ASSET CREATION - DINER PROPS
29/6/2019
 A couple of days ago, I decided to create some 3D art assets. They will be put into a unity package, and ultimately upload it onto the Unity Asset Store when finished. I decided to go with a diner theme for these 3D models. Before a came to that conclusion, I looked up diner assets on the Unity Asset Store by just typing in the word 'diner'. About 11 packages popped up. All have a price tag to them, the lowest is $4.99 while the highest is at $55. Right now, I'm trying to decide if I should make this package free (which will make it the only package free when 'diner' is typed in the search bar) or sell it at the lowest price possible on the Asset Store (which is $4.99). I think I'll have more of a final answer when I've modelled and textured most of the assets, and see how the package looks as a whole. I will also upload the package onto my itch.io page as well if its legally allowed to be uploaded there as well as on Unity's store. Unity's store guidelines might state that the packages uploaded to their store have to be exclusive to that store.  I'm also trying to use the least polygons on each object without losing the shape of that said object. The texture maps (albedo) are just plain colours to create a that simplistic look, and all map sizes are at 512 x 512. The albedo maps can be edited so that the colours of the objects can be changed (you might not like the colour red!).
As of right now I've modelled 13 assets, and my goal is to model at least one every day. I have a total of 69 models that are planned to be created, but that number could change depending on what I think is missing from the package or what models aren't needed. HIDING BEHIND A WALL? (UNITY & C#)
11/4/2019
 If the platform your building your game to doesn't support a specific custom shader that contains the ability to see the player through a wall, I have an alternate way that may help you with that problem. I had been messing around with a New Nintendo 3DS development kit, and found out that it doesn't support custom shaders. Specifically, a shader I wanted to use which gave the ability to see the player behind a wall, so the actual person playing the game knows where the character is on screen. This alternate option uses a Linecast from the Camera game object to the position of the Player, and then when the player is behind a wall a sprite pops up on the screen where the player is positioned. You can imagine that the sprite could be some quirky animating image of the face of the main character. I have a couple of other scripts running during the game, a player controller script, a camera follow, etc. I will only go through the ability to find where the player is when him/her is behind a wall. Also, I am using an orthographic projection on the camera, but not to worry because this alternate way will still work if your camera is in a perspective view. Full C# Script and Example at bottom of blog post. Checked with Unity version: 2018.3
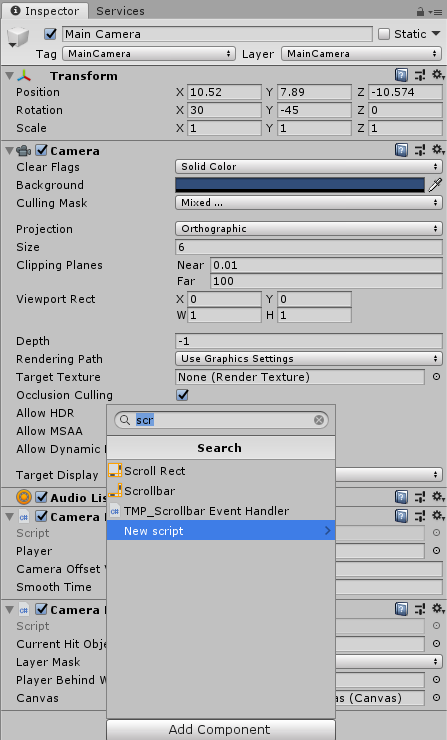
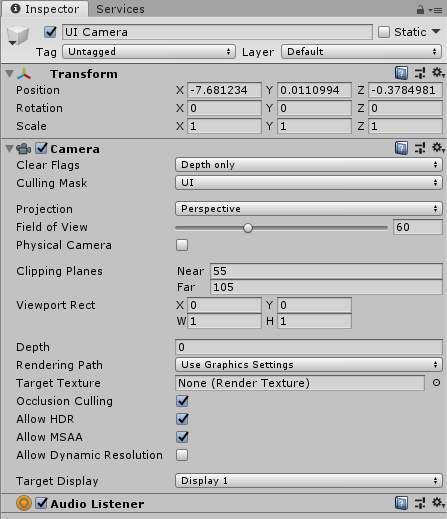
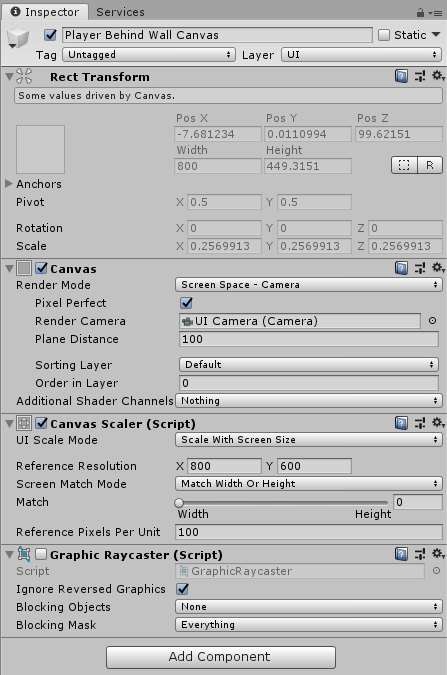
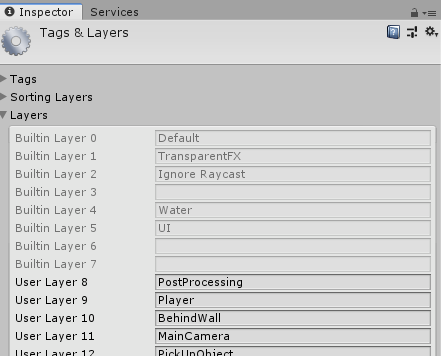
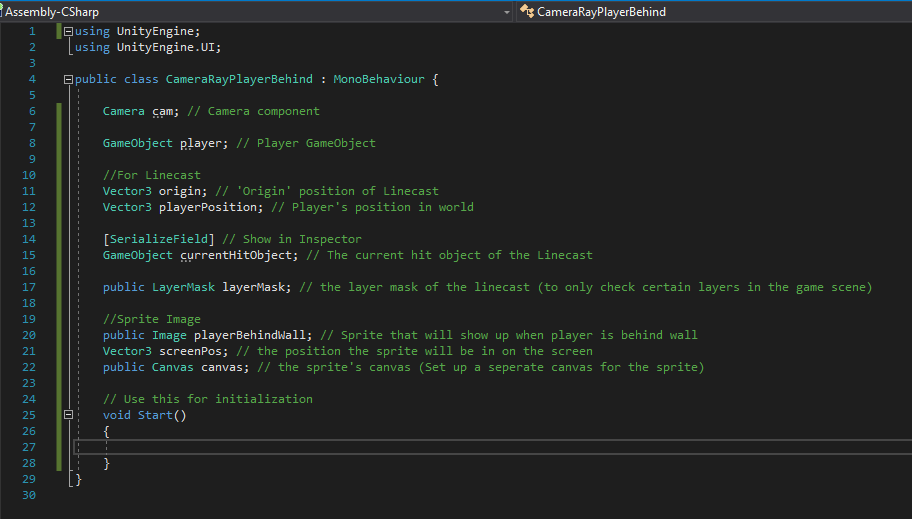 Then back in Unity, create/add a player game object if you haven't yet (e.g. Create -> 3D object -> Cube), create a Canvas (Create -> UI -> Canvas), and name them anything you like. On that canvas I changed the Render Mode to Screen Space - Camera, and also created another Camera game object that takes care of the UI elements in the game. I then dragged the UI Camera in the Render Camera slot on the Canvas. You can choose to do this or just stick to one camera. (There are no scripts on the UI Camera, just on the Main Camera). If your using two cameras don't forget to uncheck UI on the Culling Mask of the Main Camera and select the UI layer on the Culling Mask on the UI Camera and nothing else. Also make sure the Layer of each game object is correctly displayed just like the pictures below. (Main Camera Layer = Main Camera, Canvas Layer = UI).
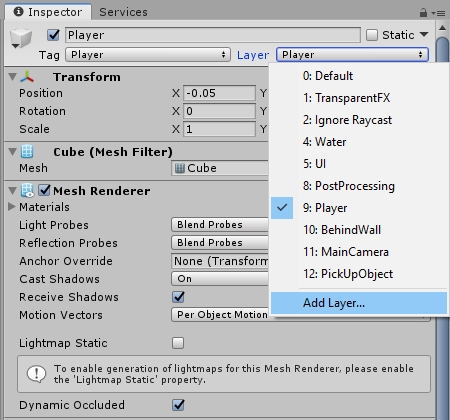
Now create an image (Create -> UI -> Image) and add it to your canvas, This is going to be the sprite that shows up on the screen when the player is behind a wall (make sure you choose a sprite for your UI Image). Select the Main Camera and in the boxes below on the script drag your Image and Canvas to the script. 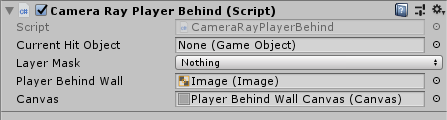 After that, it's time to create some layers. On the Player, go to the Layer option in the Inspector tab, and add Layer. Now add two new Layers, name one Player and the other BehindWall.
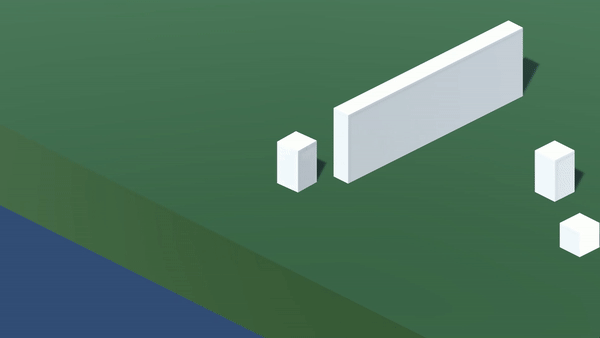
Make sure you set the Player layer onto the player after creating it. And now create a new game object or if you have a wall in your scene, make sure the layer of that object/wall is set on BehindWall. You can also open up the Project Settings (Edit -> Project Settings...) and uncheck a couple of things on the Layer Collision Matrix on the Physics tab.  With that now done, we can go back and select the Main Camera and now on the script we can choose the Player and BehindWall layers on the LayerMask. 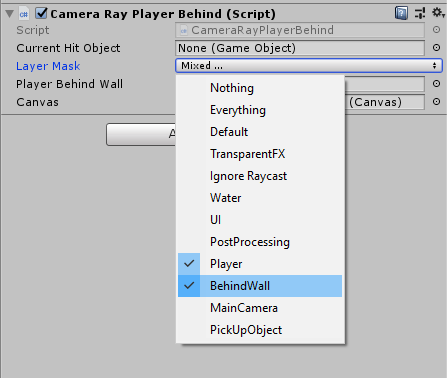 Back to the script. In the Start function add these lines: 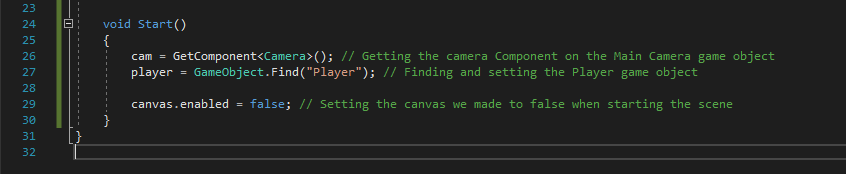 Now let's set up the Linecast. (you can also find out more on Linecasts here .) 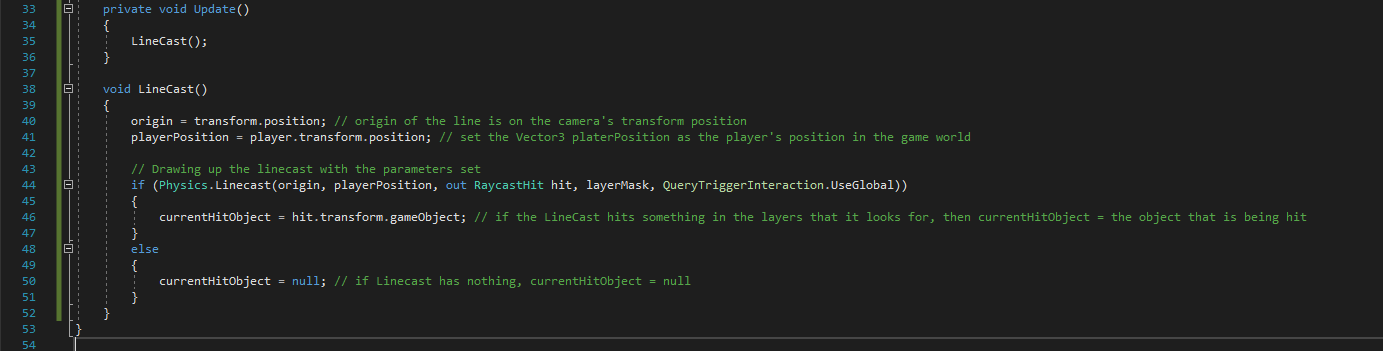 After we have set up the Linecast, we can now use its information. So that if the Linecast is not hitting the Player, which will only happen when a wall (with the Layer set to BehindWall) is between the line and the Player. We then show the sprite, which will follow the player behind the wall. 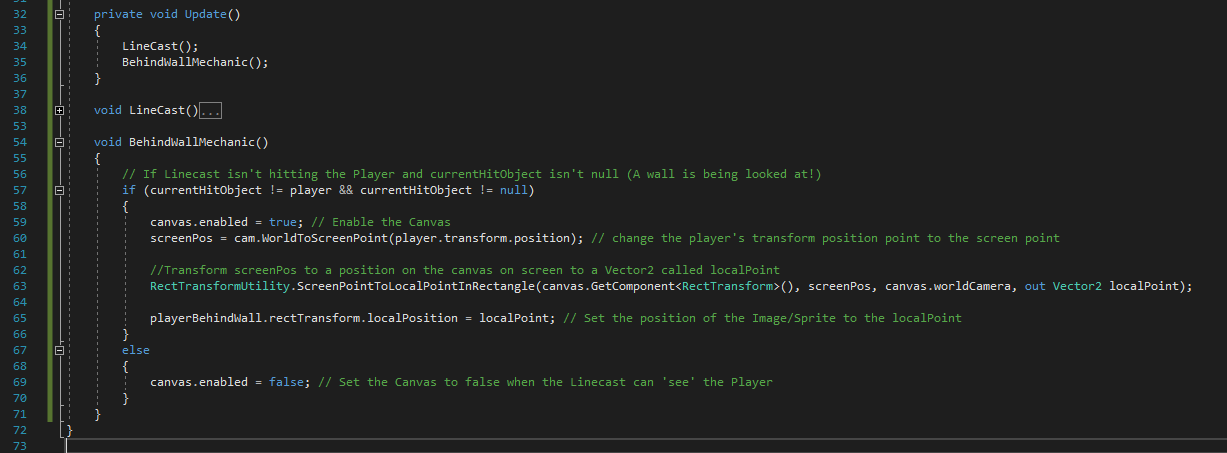 When the Player is behind a wall the sprite image will pop up and follow the player as long as you are behind a wall. Another thing we could add just below this piece of code to make it easier to visualise the line is this:  Now when we press the Play button in the Unity Editor a line will be drawn in the Scene view when selecting the Main Camera. 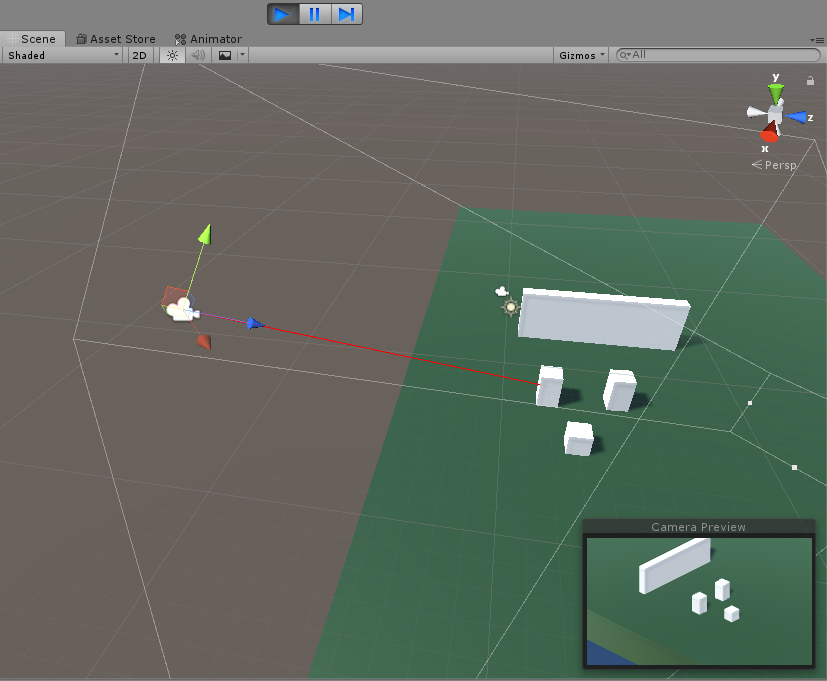
Full Script
P.S./Edit: Instead of enabling and disabling the canvas, you can also just turn the actual Image Gameobject on and off.
|
Archives
May 2022
Categories |


 RSS Feed
© Stefan Dolidis